Wagtail Tutorial Series:
To learn more about Wagtail CMS, please check Build Blog With Wagtail CMS (4.0.0)
- Create Wagtail Project
- Modern Frontend Techs for Wagtail
- Dockerizing Wagtail App
- Add Blog Models to Wagtail
- How to write Wagtail page template
- Create Stylish Wagtail Pages with Tailwind CSS
- How to use StreamField in Wagtail
- Wagtail Routable Page
- Add Pagination Component to Wagtail
- Customize Wagtail Page URL
- Add Full Text Search to Wagtail
- Add Markdown Support to Wagtail
- Add LaTeX Support & Code Highlight In Wagtail
- How to Build Form Page in Wagtail
- How to Create and Manage Menus in Wagtail
- Wagtail SEO Guide
- Online Demo http://wagtail-blog.accordbox.com/
- Source code: https://github.com/AccordBox/wagtail-tailwind-blog
Wagtail Tips:
- Wagtail Tip #1: How to replace ParentalManyToManyField with InlinePanel
- Wagtail Tip #2: How to Export & Restore Wagtail Site
Write style in Wagtail:
- How to use SCSS/SASS in your Django project (Python Way)
- How to use SCSS/SASS in your Django project (NPM Way)
Other Wagtail Topics:
Objectives
By the end of this chapter, you should be able to:
- Understand how
StreamFieldworks - Use
StreamFieldto storebodyvalue of the PostPage. - Write template to display the
StreamField - Use
tailwindcss/typographyplugin to add beautiful typographic defaults to vanilla HTML
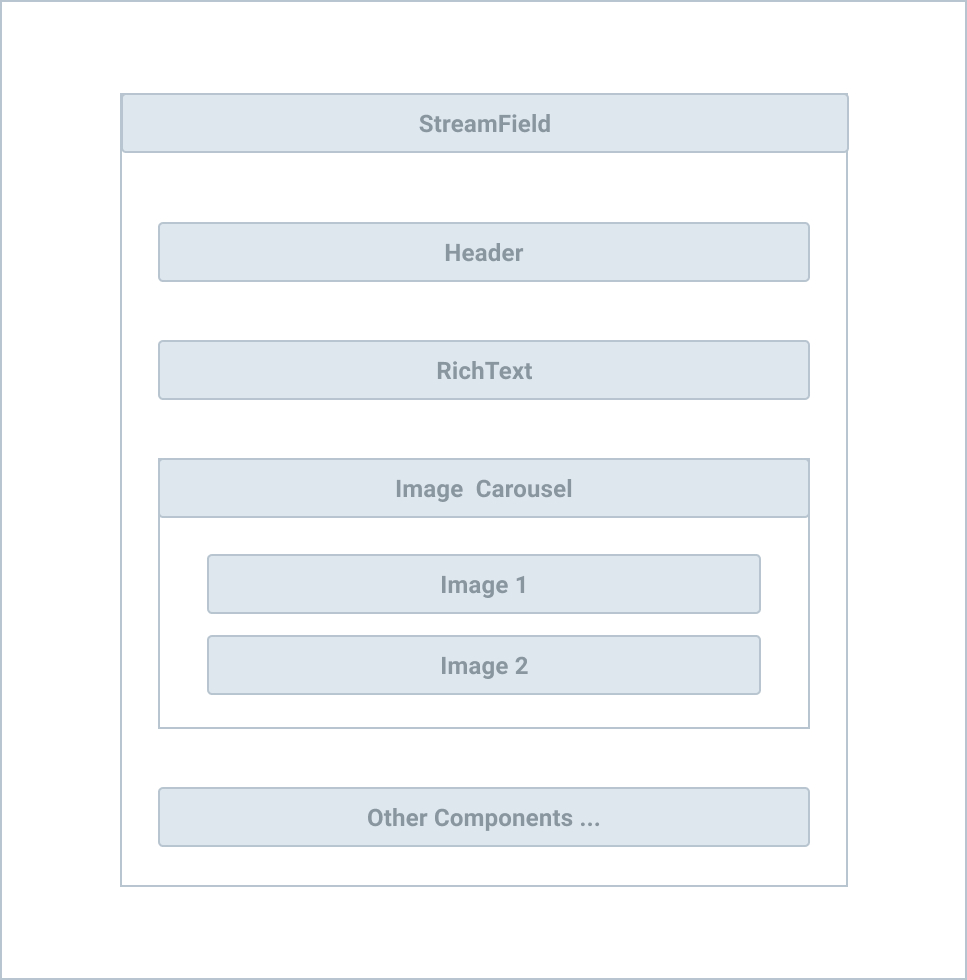
What is StreamField
StreamField provides a flexible way for us to construct content.
The StreamField is a list which contains the value and type of the sub-blocks (we will see it in a bit). You can use the built-in block shipped with Wagtail or you can create your custom block.
Some block can also contains sub-block so you can use it to create a complex nested data structure, which is powerful.
Block
From my understanding, I'd like to group the Wagtail built-in blocks in this way.
- Basic block, which is similar with Django model field types For example,
CharBlock,TextBlock,ChoiceBlock - Chooser Block, which is for
object selection. For example,PageChooserBlock,ImageChooserBlock. StructBlock, which works likedict(Object injs) and containsfixedsub-blocks.StreamBlock,ListBlock, which works likelist(Arrays injs), and containsno-fixedsub-blocks.
Body
Next, let's use StreamField to define the PostPage.body
It is recommended to put blocks in a separate file to keep your model clean.
wagtail_app/blog/blocks.py
from wagtail.core.blocks import (BooleanBlock, CharBlock, ChoiceBlock,
                                 DateTimeBlock, FieldBlock, IntegerBlock,
                                 ListBlock, PageChooserBlock, RawHTMLBlock,
                                 RichTextBlock, StreamBlock, StructBlock,
                                 StructValue, TextBlock, URLBlock)
from wagtail.images.blocks import ImageChooserBlock


class ImageText(StructBlock):
    reverse = BooleanBlock(required=False)
    text = RichTextBlock()
    image = ImageChooserBlock()


class BodyBlock(StreamBlock):
    h1 = CharBlock()
    h2 = CharBlock()
    paragraph = RichTextBlock()

    image_text = ImageText()
    image_carousel = ListBlock(ImageChooserBlock())
    thumbnail_gallery = ListBlock(ImageChooserBlock())
ImageTextinherits fromStructBlock, it has three sub-blocks, we can only set values toreverse,textandimage.BodyBlockinherits fromStreamBlock, we can add more than one sub-blocks becauseStreamBlockbehaves like list.
Update wagtail_app/blog/models.py
from wagtail.core.fields import StreamField
from .blocks import BodyBlock


class PostPage(Page):
    header_image = models.ForeignKey(
        "wagtailimages.Image",
        null=True,
        blank=True,
        on_delete=models.SET_NULL,
        related_name="+",
    )

    tags = ClusterTaggableManager(through="blog.PostPageTag", blank=True)

    body = StreamField(BodyBlock(), blank=True)        # new

    content_panels = Page.content_panels + [
        FieldPanel("header_image"),
        InlinePanel("categories", label="category"),
        FieldPanel("tags"),
        FieldPanel("body"),                           # new
    ]
- Import
BodyBlockfrom./blocks - Define body
body = StreamField(BodyBlock(), blank=True) - Remember to update
content_panelsso you can edit in Wagtail admin.
Migrate the db
$ docker-compose run --rm web python manage.py makemigrations
$ docker-compose run --rm web python manage.py migrate
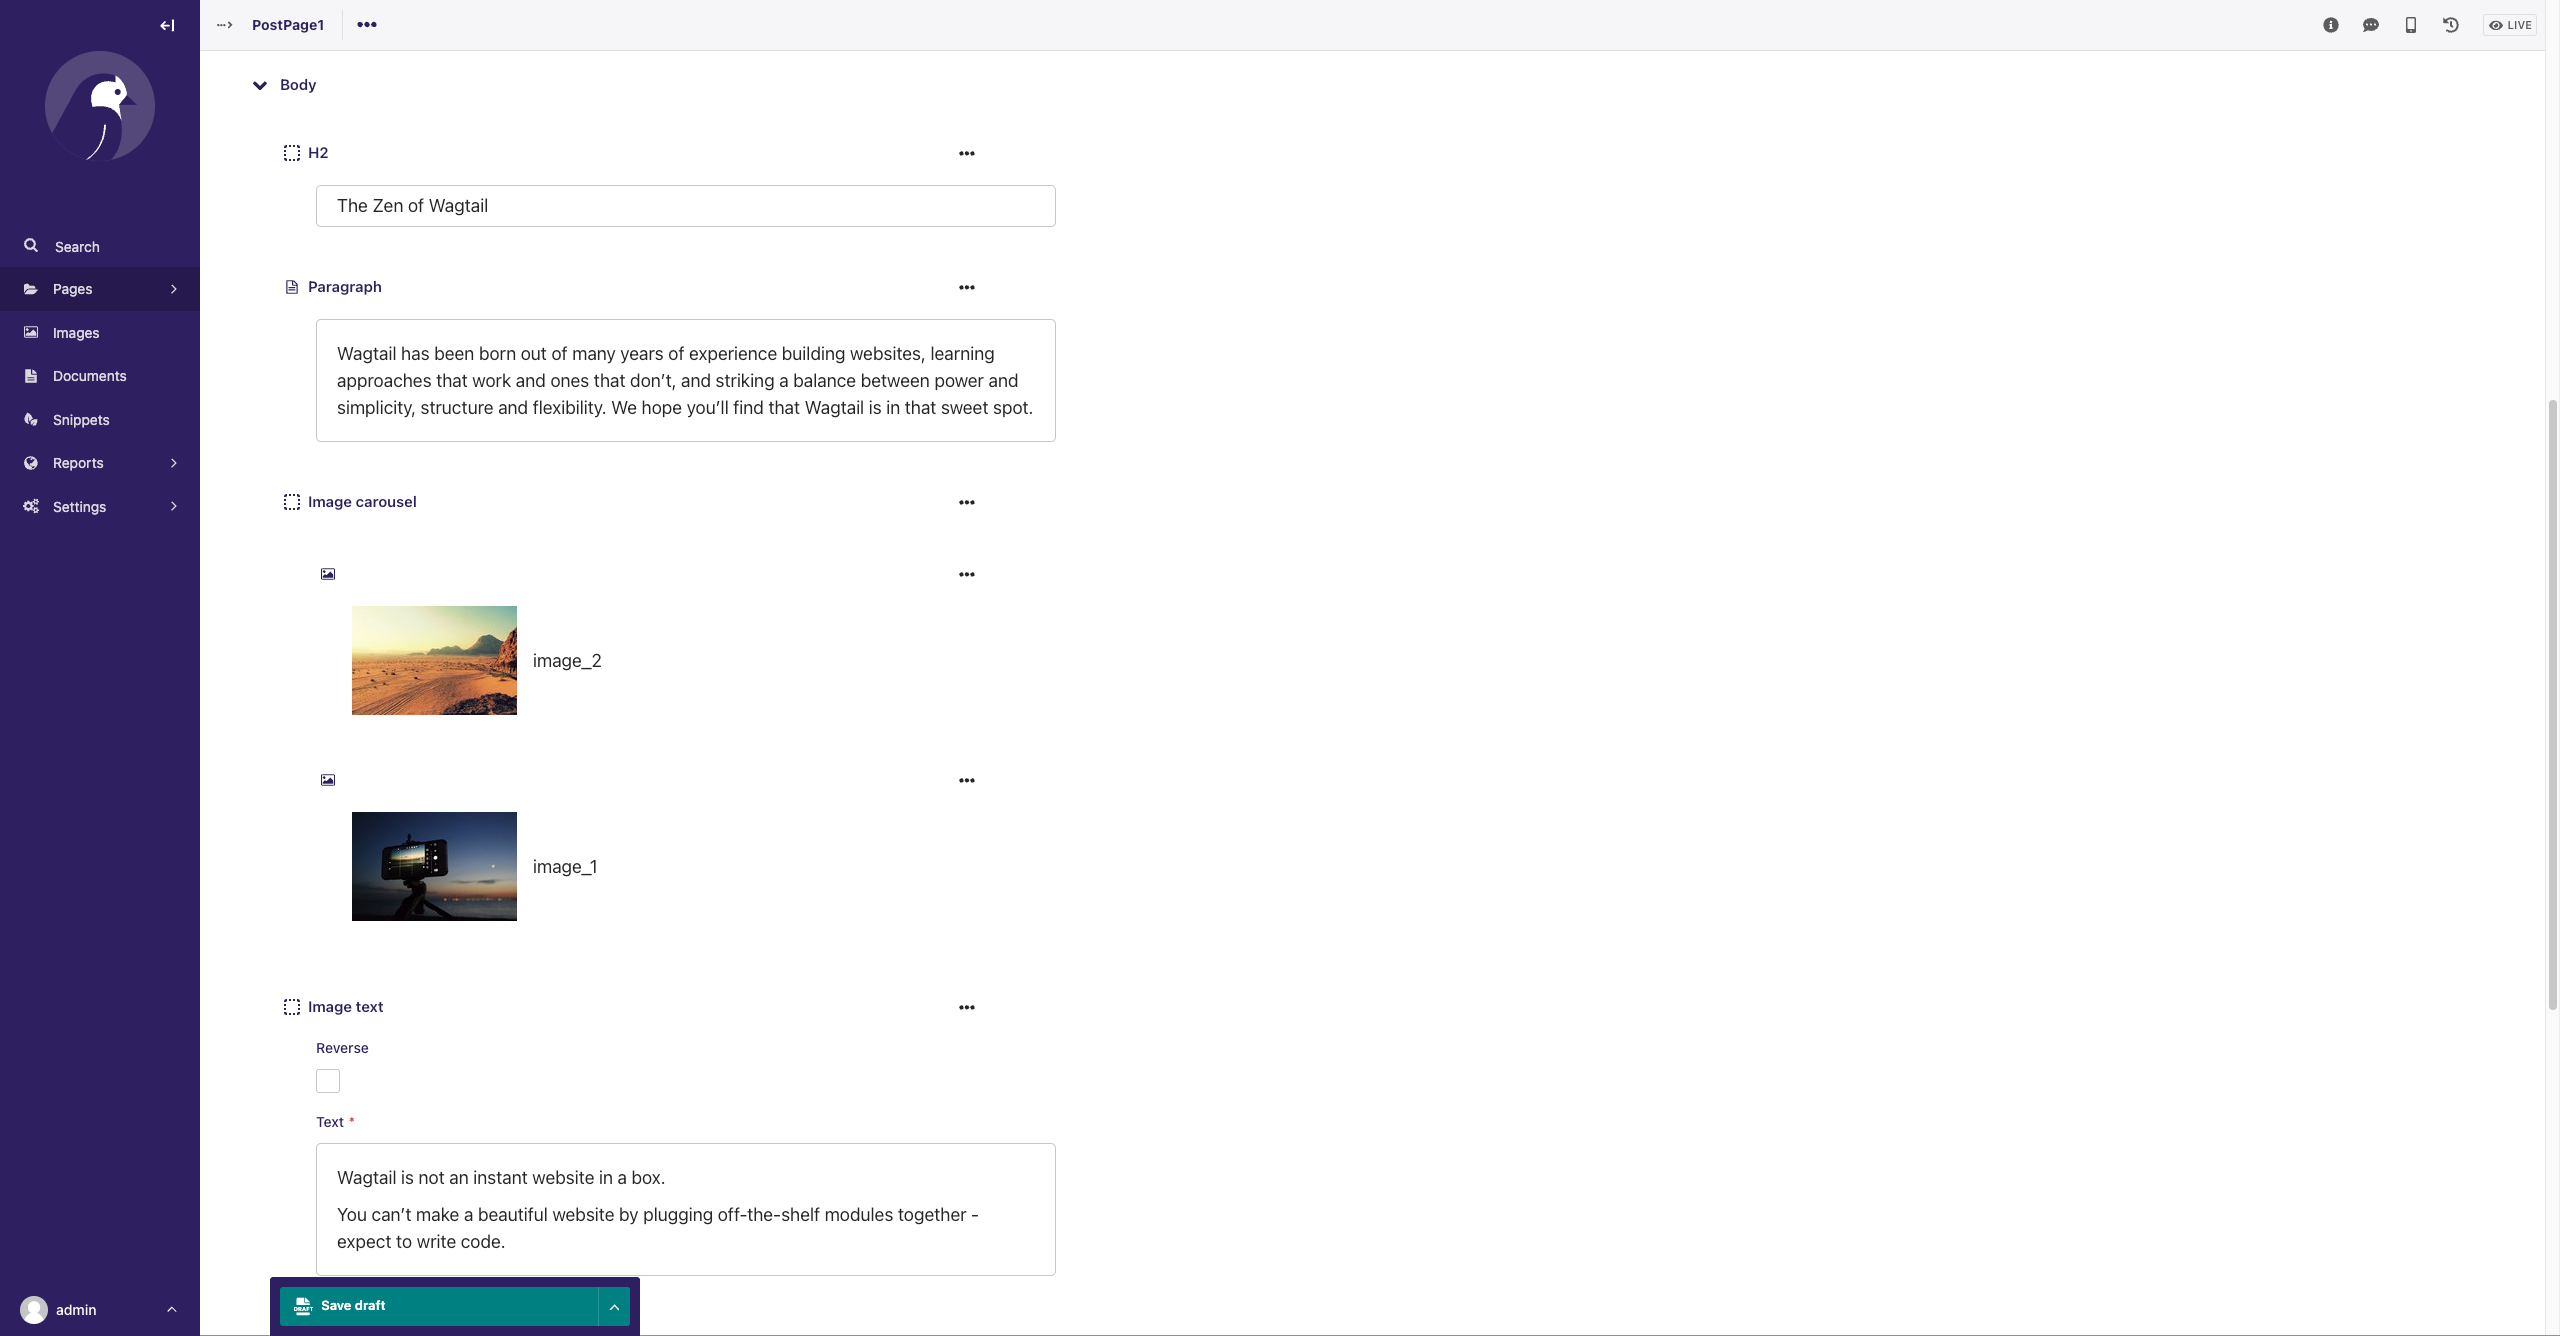
Now login Wagtail admin and add some content to the body.
Dive Deep
Let's run some code to learn more about StreamField and Django shell.
# please run code in new Django shell if you change something
$ docker-compose run --rm web python manage.py shell
>>> from wagtail.core.models import Page

>>> page = Page.objects.get(pk=4).specific

>>> page.body.raw_data
[{'type': 'h2', 'value': 'The Zen of Wagtail', 'id': '4459eb75-e287-4d07-8a6f-ae1c998ac8c7'}, {'type': 'paragraph', 'value': '<p data-block-key="n0lty">Wagtail has been born out of many years of experience building websites, learning approaches that work and ones that don’t, and striking a balance between power and simplicity, structure and flexibility. We hope you’ll find that Wagtail is in that sweet spot.</p>', 'id': '755459ff-4787-44e2-91ea-be5116e32fb3'}, {'type': 'image_carousel', 'value': [{'type': 'item', 'value': 2, 'id': '47f95521-1552-4281-8460-2edc667a1848'}, {'type': 'item', 'value': 1, 'id': '936644ed-650e-4a5b-96bc-02a12cb13df1'}], 'id': '8f2186dd-9481-4cd8-b34c-825e0cc8f46d'}, {'type': 'image_text', 'value': {'reverse': False, 'text': '<p data-block-key="nk1vo">Wagtail is not an instant website in a box.</p><p data-block-key="9892p">You can’t make a beautiful website by plugging off-the-shelf modules together - expect to write code.</p>', 'image': 3}, 'id': '18ed8084-fbec-4711-8051-9ff2d04f3732'}, {'type': 'image_text', 'value': {'reverse': True, 'text': '<p data-block-key="nk1vo">A CMS should get information out of an editor’s head and into a database, as efficiently and directly as possible.</p>', 'image': 1}, 'id': 'b8a96d89-873b-45ab-a1b7-92c2e08622db'}]

# let's make the data look more clear
>>> import pprint
>>> pprint.pprint(list(page.body.raw_data))
[{'id': '4459eb75-e287-4d07-8a6f-ae1c998ac8c7',
  'type': 'h2',
  'value': 'The Zen of Wagtail'},
 {'id': '755459ff-4787-44e2-91ea-be5116e32fb3',
  'type': 'paragraph',
  'value': '<p data-block-key="n0lty">Wagtail has been born out of many years '
           'of experience building websites, learning approaches that work and '
           'ones that don’t, and striking a balance between power and '
           'simplicity, structure and flexibility. We hope you’ll find that '
           'Wagtail is in that sweet spot.</p>'},
 {'id': '8f2186dd-9481-4cd8-b34c-825e0cc8f46d',
  'type': 'image_carousel',
  'value': [{'id': '47f95521-1552-4281-8460-2edc667a1848',
             'type': 'item',
             'value': 2},
            {'id': '936644ed-650e-4a5b-96bc-02a12cb13df1',
             'type': 'item',
             'value': 1}]},
 {'id': '18ed8084-fbec-4711-8051-9ff2d04f3732',
  'type': 'image_text',
  'value': {'image': 3,
            'reverse': False,
            'text': '<p data-block-key="nk1vo">Wagtail is not an instant '
                    'website in a box.</p><p data-block-key="9892p">You can’t '
                    'make a beautiful website by plugging off-the-shelf '
                    'modules together - expect to write code.</p>'}},
 {'id': 'b8a96d89-873b-45ab-a1b7-92c2e08622db',
  'type': 'image_text',
  'value': {'image': 1,
            'reverse': True,
            'text': '<p data-block-key="nk1vo">A CMS should get information '
                    'out of an editor’s head and into a database, as '
                    'efficiently and directly as possible.</p>'}}]
- For basic block, the
valueis usually number and string. - For chooser block, the
valueis theprimary keyof the selected object. - For
StructBlock, thevalueis a Python dict - For
StreamBlockandListBlock, thevalueis a Python List.
Templates
Next, let's try to display the StreamField value in the Django template.
Update wagtail_app/templates/blog/post_page.html
{% extends "base.html" %}

{% load wagtailcore_tags wagtailimages_tags %}

{% block content %}

  {% image page.header_image original as header_image %}
  <img src="{{ header_image.url }}" alt="{{ header_image.alt }}">

  <h1>{{ page.title }}</h1>

  {% include "blog/components/streamfield.html" %}

{% endblock %}
Notes:
- Here we include
blog/components/streamfield.htmlto display the body value.
Create wagtail_app/templates/blog/components/streamfield.html
{% load static wagtailcore_tags blogapp_tags %}

{% with blocks=page.body %}
  {% for block in blocks %}
    {% if block.block_type == 'h1' %}
      <div>
        <h1>{{ block.value }}</h1>
      </div>
    {% elif block.block_type == 'h2' %}
      <div>
        <h2>{{ block.value }}</h2>
      </div>
    {% elif block.block_type == 'paragraph' %}
      <div>
        {{ block.value|richtext }}
      </div>
    {% elif block.block_type == 'image_text' %}
      <div>
        {% include 'blog/blocks/image_text.html' with block=block only %}
      </div>
    {% elif block.block_type == 'image_carousel' %}
      <div>
        {% include 'blog/blocks/image_carousel.html' with block=block only %}
      </div>
    {% else %}
      <section class="block-{{ block.block_type }}">
        {{ block }}
      </section>
    {% endif %}
  {% endfor %}
{% endwith %}
Notes:
- Here we use Django for-loop to iterate the
body, and return different HTML based on theblock_type - The
onlyoption in theincludetemplate tag, would make sure no other context variables are available in the template Django include - Please note I did not use Wagtail's
include_blockor{{ block }}here and I will explain in a bit.
Create wagtail_app/templates/blog/blocks/image_text.html
{% load wagtailcore_tags wagtailimages_tags %}

<div class="flex items-center mx-auto flex-col {% if block.value.reverse %}sm:flex-row-reverse{% else %}sm:flex-row{% endif %}">
  <div class="w-full sm:w-1/3 md:w-1/4 lg:w-5/12 px-2">
    <div>
      {{ block.value.text|richtext }}
    </div>
  </div>
  <div class="w-full sm:w-2/3 md:w-3/4 lg:w-7/12 px-2">
    {% image block.value.image width-800 as img %}
    <img alt="" src="{{ img.url }}">
  </div>
</div>
Create wagtail_app/templates/blog/blocks/image_carousel.html
{% load wagtailcore_tags wagtailimages_tags %}

<div>
  {% for item in block.value %}
    {% image item width-400 as img %}
    <img class="block w-full select-none" src="{{ img.url }}" alt="{{ img.alt }}">
  {% endfor %}
</div>
Notes:
- We will use Javascript to create image carousel in later chapter, for now, let's only display the images.
$ docker-compose up -d
$ docker-compose logs -f
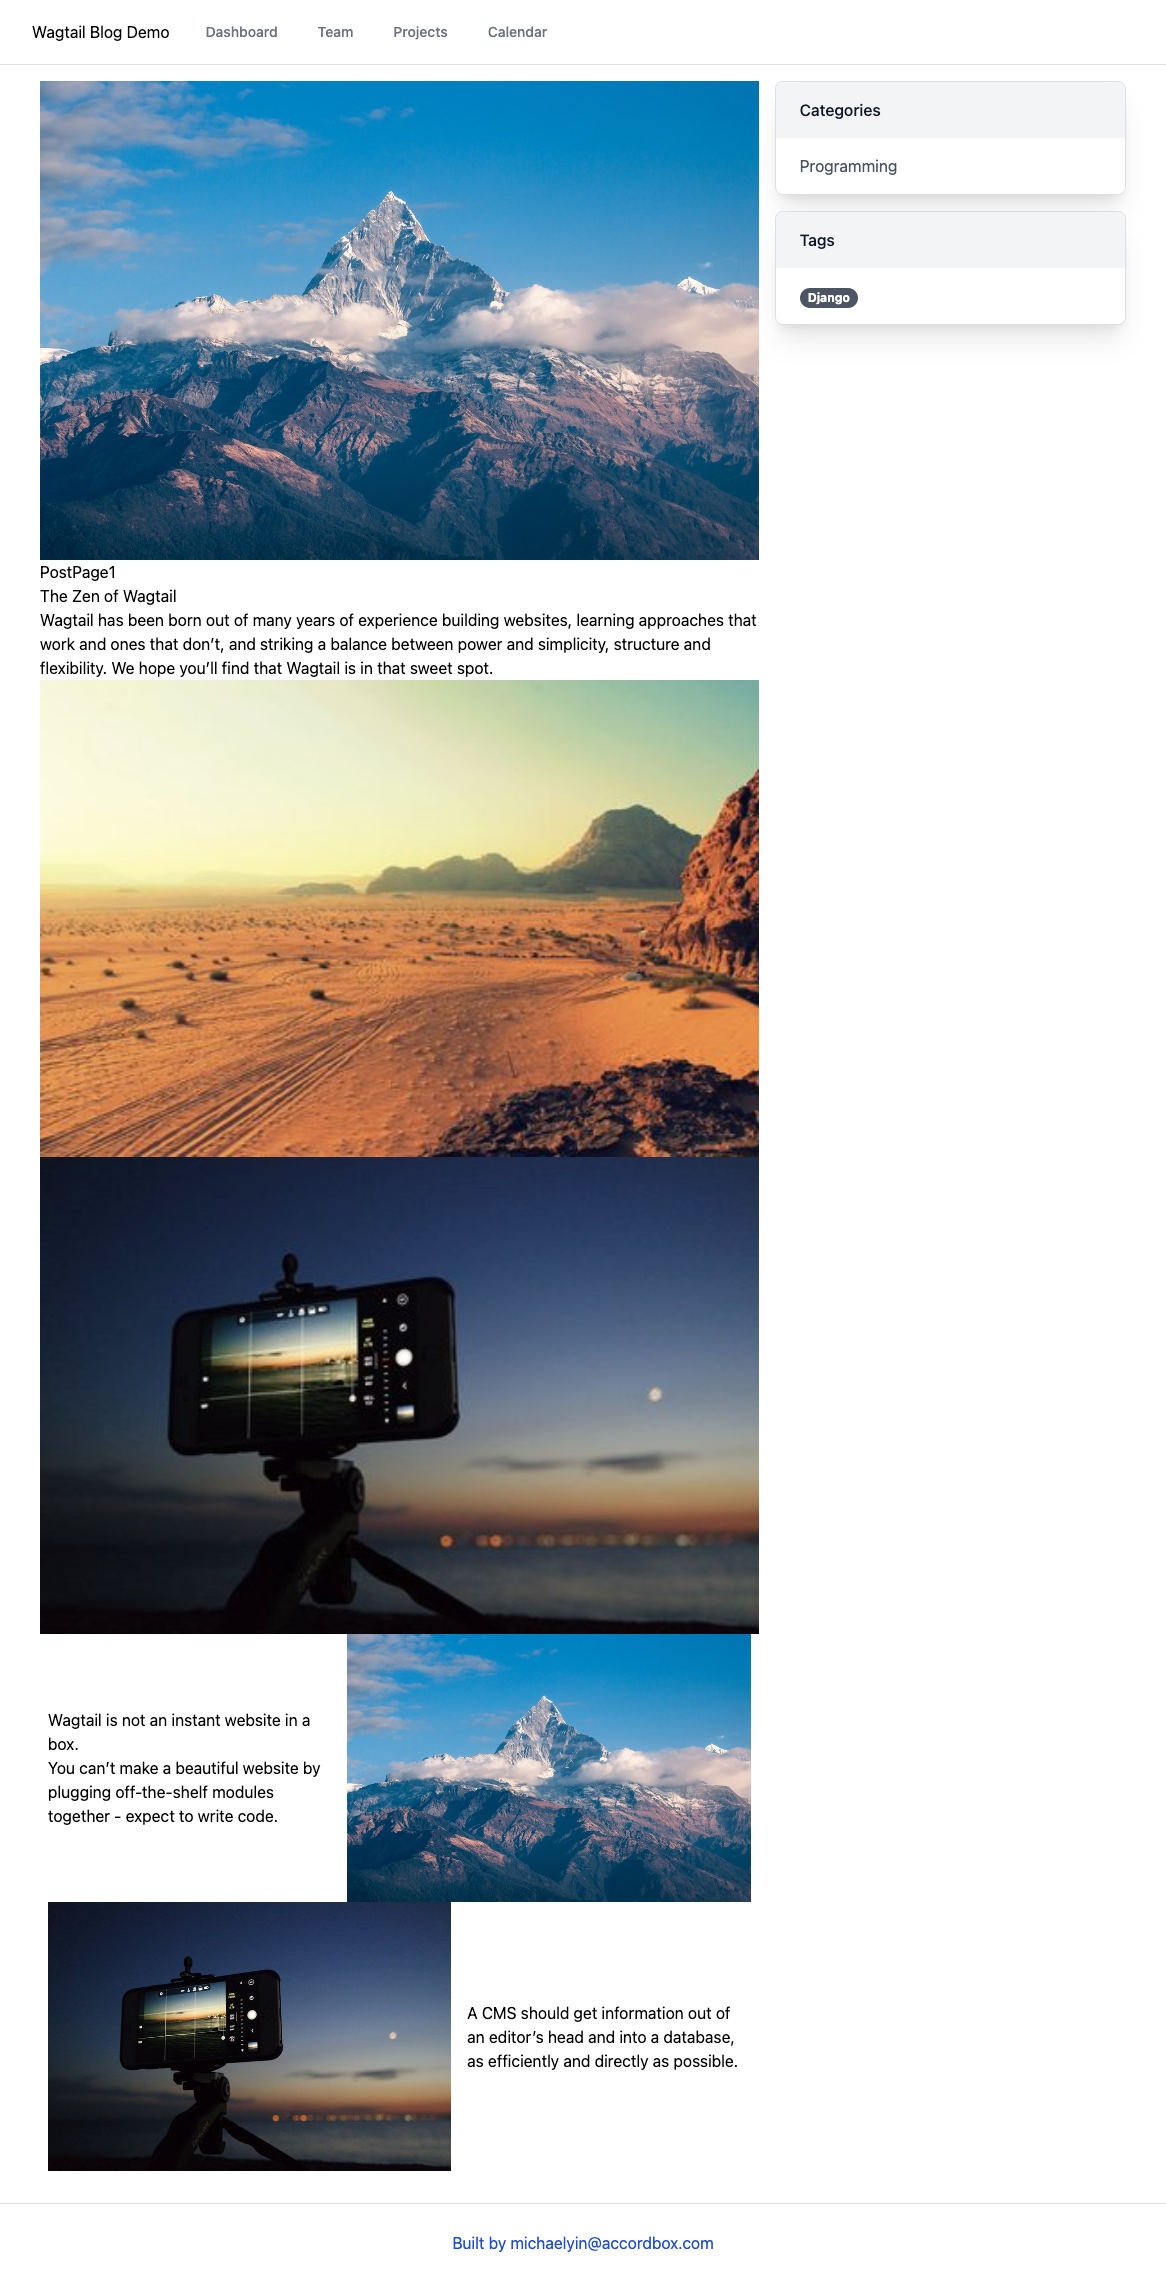
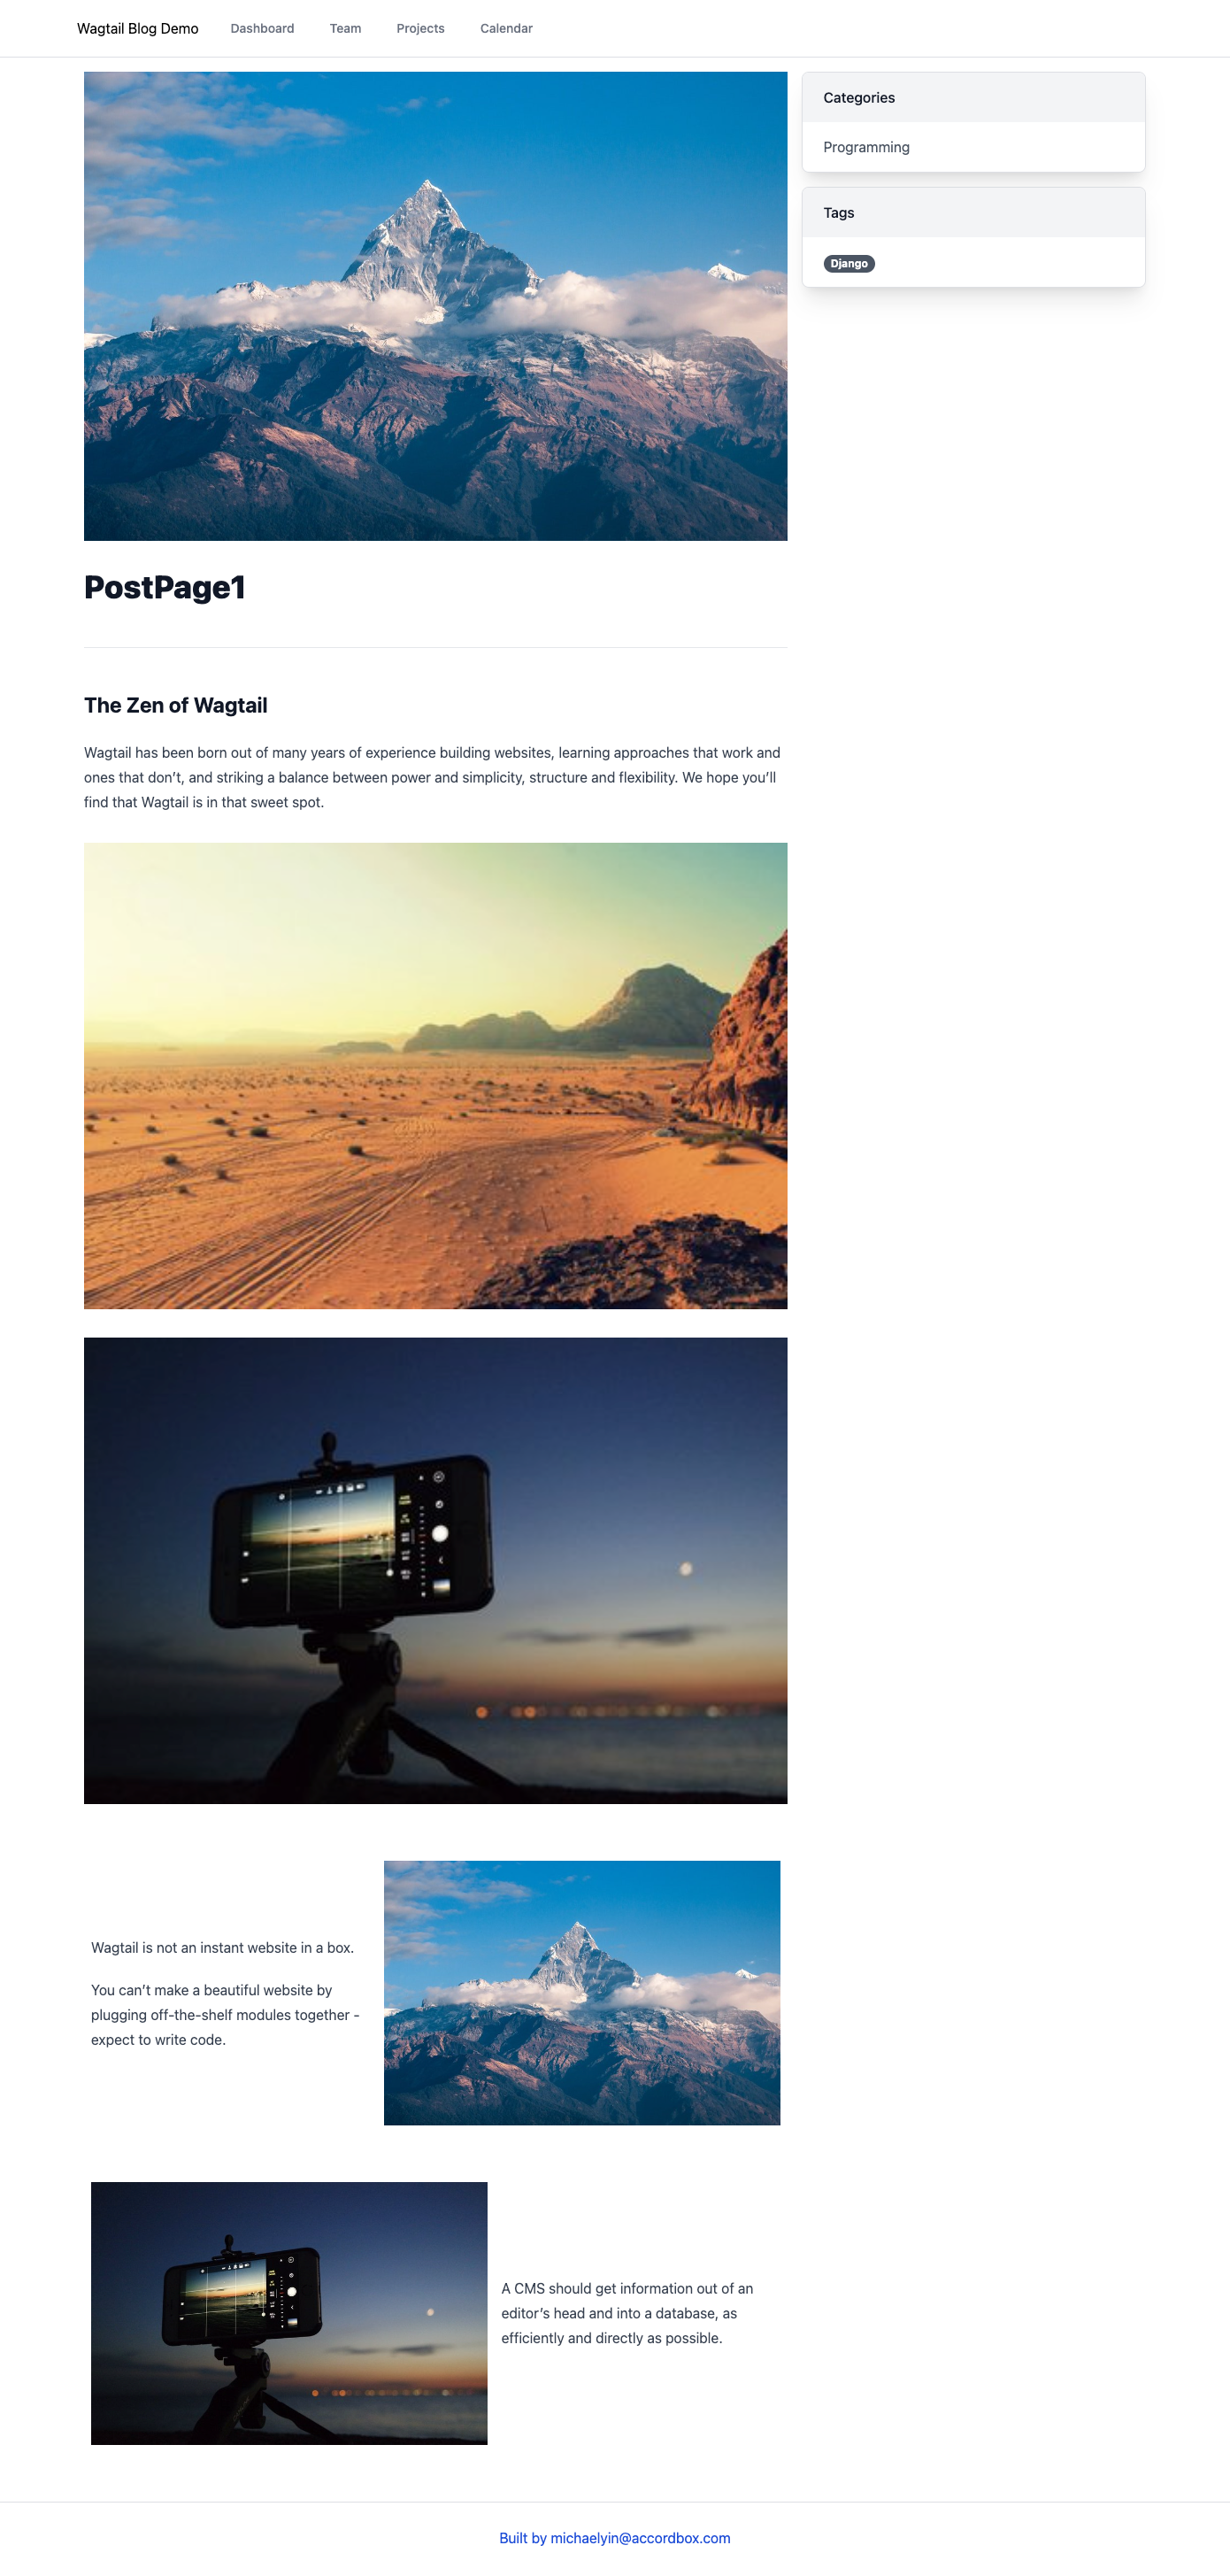
From the screenshot, we can see the body field has been rendered in correct way, however, the styles does not seem good.
Some people are willing to add some css classes such as text-xl to improve the text style, but please hold on because I will talk about another solution soon.
Install tailwindcss/typography
Tailwind CSS has some official plugins, let's use one of them here.
$ npm install @tailwindcss/typography
Update tailwind.config.js
module.exports = {
  ...

  plugins: [
    require('@tailwindcss/typography'),            // new
  ],
}
prose
The official Tailwind CSS Typography plugin provides a set of prose classes you can use to add beautiful typographic defaults to any vanilla HTML you don’t control, like HTML rendered from Markdown, or pulled from a CMS.
Update wagtail_app/templates/blog/post_page.html
{% extends "base.html" %}

{% load wagtailcore_tags wagtailimages_tags %}

{% block content %}

<div class="prose max-w-full">
  {% image page.header_image original as header_image %}
  <img src="{{ header_image.url }}" alt="{{ header_image.alt }}">
  <h1>{{ page.title }}</h1>
  <hr/>
  <div></div>
</div>

<div class="prose max-w-full">
  {% include "blog/components/streamfield.html" %}
</div>

{% endblock %}
Notes:
- We use
proseto addtypographic defaultsto the HTML. - We use
max-w-fullto overwrite themax-widthof thetypographic defaults
Notes:
- As you can see, the page text style looks much better now, and we can even change the default style by editing
tailwind.config.jsfile. - If you want to customize
tailwind typography, you can check this example https://github.com/timlrx/tailwind-nextjs-starter-blog/blob/v1.5.6/tailwind.config.js
include VS include_block
In Wagtail, if you want to specify Django template for some block, there are some different ways.
Solution 1
blocks.ImageText(template='image_text.html')
Solution 2
class ImageText(StructBlock):
    reverse = BooleanBlock(required=False)
    text = RichTextBlock()
    image = CustomImageChooserBlock()

    class Meta:
        template = 'image_text.html'
Notes:
- Solution 1 and 2 can both work with
include_blockfrom Wagtail. - In the template, we need to access the block value using code like this
{{ value.text|richtext }} - And I highly recommend you to read this section of Wagtail doc: BoundBlocks and values
Solution 3
{% include 'blog/blocks/image_text.html' with block=block only %}
includea is built-in template tag from Django, and I wish people to understandincludebetter here (include_blockseems like asyntax sugar)- The
templateinfo is stored in parent template instead of themodelfile.
JSON Field
From Wagtail 4, you might see this warning if you do not set use_json_field in StreamField
StreamField must explicitly set use_json_field argument to True/False instead of None.
- If
use_json_field=False, Wagtail would useTextFieldto store the data - If
use_json_field=True, Wagtail would useJsonFieldto store the data.
Let's update the body field by setting use_json_field explicitly
body = StreamField(BodyBlock(), blank=True, use_json_field=True)
Do not forget to run db migration
Wagtail Tutorial Series:
To learn more about Wagtail CMS, please check Build Blog With Wagtail CMS (4.0.0)
- Create Wagtail Project
- Modern Frontend Techs for Wagtail
- Dockerizing Wagtail App
- Add Blog Models to Wagtail
- How to write Wagtail page template
- Create Stylish Wagtail Pages with Tailwind CSS
- How to use StreamField in Wagtail
- Wagtail Routable Page
- Add Pagination Component to Wagtail
- Customize Wagtail Page URL
- Add Full Text Search to Wagtail
- Add Markdown Support to Wagtail
- Add LaTeX Support & Code Highlight In Wagtail
- How to Build Form Page in Wagtail
- How to Create and Manage Menus in Wagtail
- Wagtail SEO Guide
- Online Demo http://wagtail-blog.accordbox.com/
- Source code: https://github.com/AccordBox/wagtail-tailwind-blog
Wagtail Tips:
- Wagtail Tip #1: How to replace ParentalManyToManyField with InlinePanel
- Wagtail Tip #2: How to Export & Restore Wagtail Site
Write style in Wagtail:
- How to use SCSS/SASS in your Django project (Python Way)
- How to use SCSS/SASS in your Django project (NPM Way)
Other Wagtail Topics: