Wagtail Tutorial Series:
To learn more about Wagtail CMS, please check Build Blog With Wagtail CMS (4.0.0)
- Create Wagtail Project
- Modern Frontend Techs for Wagtail
- Dockerizing Wagtail App
- Add Blog Models to Wagtail
- How to write Wagtail page template
- Create Stylish Wagtail Pages with Tailwind CSS
- How to use StreamField in Wagtail
- Wagtail Routable Page
- Add Pagination Component to Wagtail
- Customize Wagtail Page URL
- Add Full Text Search to Wagtail
- Add Markdown Support to Wagtail
- Add LaTeX Support & Code Highlight In Wagtail
- How to Build Form Page in Wagtail
- How to Create and Manage Menus in Wagtail
- Wagtail SEO Guide
- Online Demo http://wagtail-blog.accordbox.com/
- Source code: https://github.com/AccordBox/wagtail-tailwind-blog
Wagtail Tips:
- Wagtail Tip #1: How to replace ParentalManyToManyField with InlinePanel
- Wagtail Tip #2: How to Export & Restore Wagtail Site
Write style in Wagtail:
- How to use SCSS/SASS in your Django project (Python Way)
- How to use SCSS/SASS in your Django project (NPM Way)
Other Wagtail Topics:
Objective
By the end of this chapter, you should be able to:
- Understand how Wagtail full text search works.
- Display search keywords on the search result page.
Backend
Update wagtail_app/settings.py
WAGTAILSEARCH_BACKENDS = {
    'default': {
        'BACKEND': 'wagtail.search.backends.database',
    }
}
Model
Update wagtail_app/blog/models.py
from wagtail.search import index


class PostPage(Page):

    search_fields = Page.search_fields + [
        index.SearchField('title'),
        index.SearchField('body'),
    ]
Notes:
- Here we defined
search_fieldsso Wagtail would know which fields need to be processed when indexing. - Do not forget to put
from wagtail.search import indexat the top of the file.
After this is done, let's run command to build the index.
$ docker-compose up -d
$ docker-compose logs -f

$ docker-compose exec web python manage.py update_index
Notes:
- We need to do this manually when we first setup
WAGTAILSEARCH_BACKENDS - The command would extract text from the
search_fields, and write index to the search backend. - By default, when we do db operation (create page, edit page), the
search indexwould also be updated. That is why the search function can work with latest data even we do not runupdate_indexcommand.
Let's test in the Django shell.
$ docker-compose exec web python manage.py shell
>>> from wagtail_app.blog.models import PostPage

# run search method to do full text search
>>> PostPage.objects.search('wagtail')
<SearchResults [<PostPage: PostPage3>, <PostPage: PostPage2>, <PostPage: PostPage1>]>
Route
Let's add a route to make our blog support full text search.
Update wagtail_app/blog/models.py
class BlogPage(RoutablePageMixin, Page):
    # code omitted for brevity

    @route(r"^search/$")
    def post_search(self, request, *args, **kwargs):
        search_query = request.GET.get("q", None)
        self.posts = self.get_posts()
        if search_query:
            self.posts = self.posts.search(search_query)
        return self.render(request)
Notes:
- We added a route to the
BlogPage, which handle thesearchrequest. - We get the keywords from the querystring
q
Update wagtail_app/templates/blog/components/sidebar.html
{% load blogapp_tags wagtailroutablepage_tags %}
<div class="w-full sm:w-1/3 md:w-1/4 lg:w-4/12 px-2">
{% if blog_page %}
<div class="mb-4 border rounded-lg border-opacity-75 border-gray-300 shadow-xl overflow-hidden dark:border-gray-500">
<div class="bg-gray-100 text-gray-900 px-6 py-4 dark:bg-gray-700 dark:text-gray-400">
<h4 class="text-base font-medium">Search</h4>
</div>
<div class="px-6 py-4">
<form role="search" method="get" action="/search/">
<div class="relative text-gray-700">
<input type="search"
class="w-full h-10 pl-3 pr-8 text-base placeholder-gray-600 border rounded-lg dark:bg-gray-700 dark:text-white dark:placeholder-gray-400"
name="q" placeholder="Search…"
title="Search for:" />
<button class="absolute inset-y-0 right-0 flex items-center px-4 text-white bg-blue-500 rounded-r-lg border-blue-500 hover:bg-blue-600" type="submit">Go</button>
</div>
</form>
</div>
</div>
{% categories_list %}
{% tags_list %}
{% endif %}
</div>
Notes:
- In the sidebar, we added a search form above the Category widget.
- We can even put the code in a new template file to make the
sidebar.htmlcleaner. - The
form actionis the url of thepost_searchroute. - When we submit the form, it would send
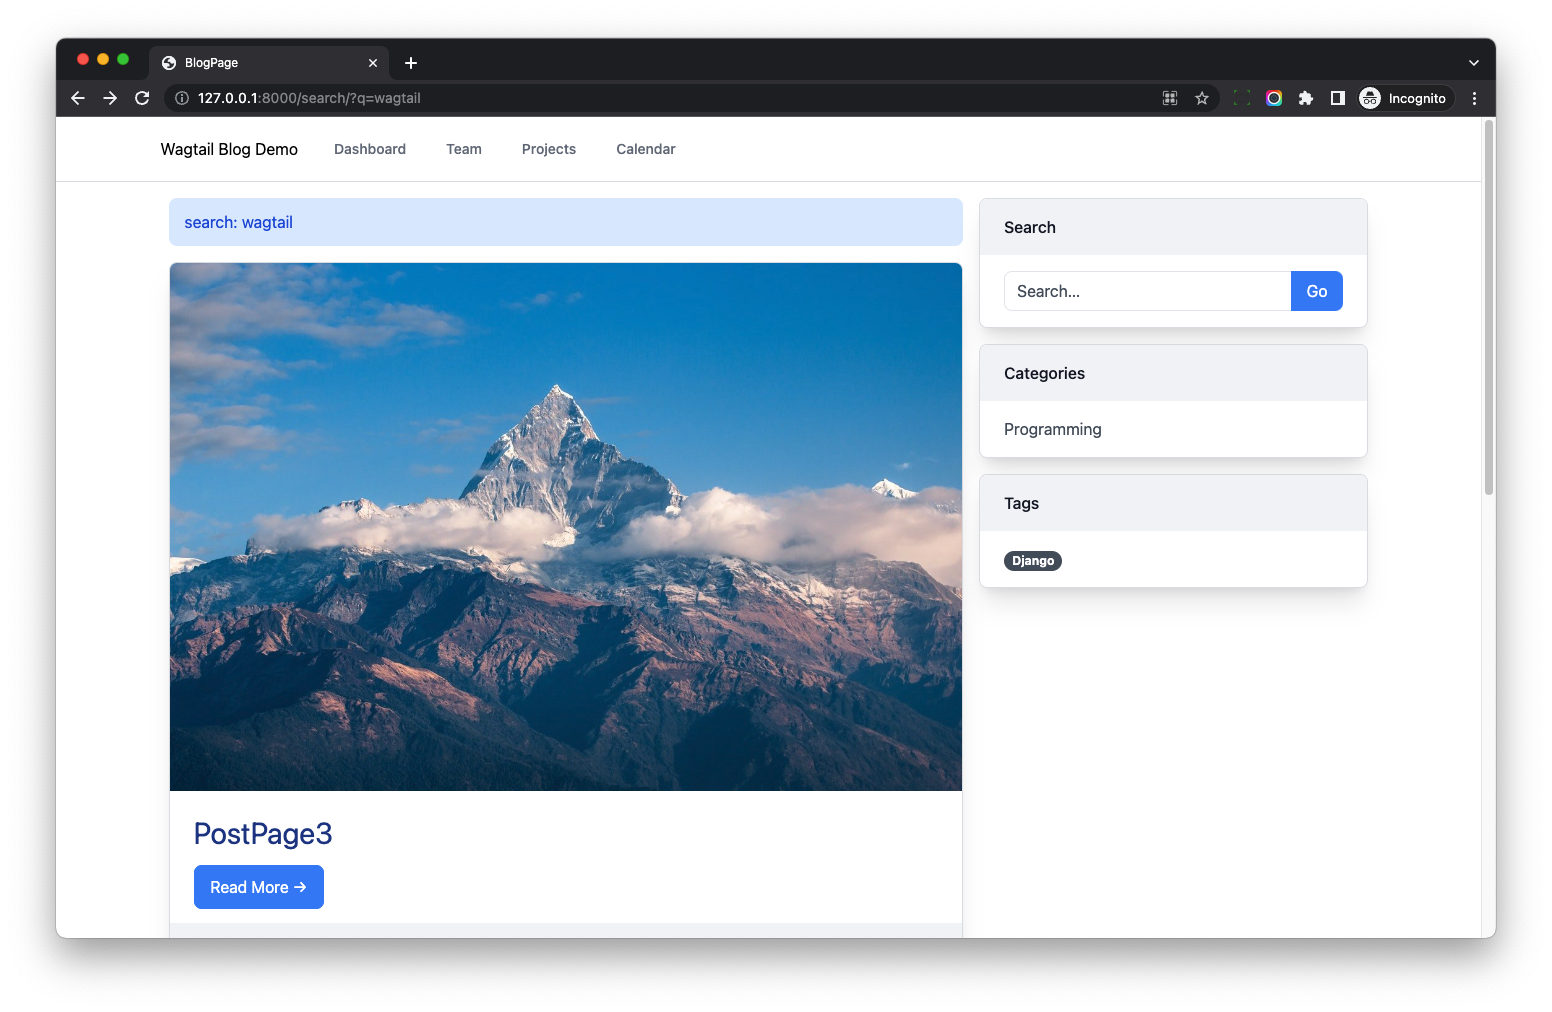
GETrequest which has url likehttp://127.0.0.1:8000/search/?q=wagtail
Display Filter Keywords
To display filter keywords on the search result page.
Update wagtail_app/blog/models.py
from django.utils.dateformat import DateFormat
from django.utils.formats import date_format


class BlogPage(RoutablePageMixin, Page):

    @route(r'^tag/(?P<tag>[-\w]+)/$')
    def post_by_tag(self, request, tag, *args, **kwargs):
        self.filter_type = 'tag'
        self.filter_term = tag
        self.posts = self.get_posts().filter(tags__slug=tag)
        return self.render(request)

    @route(r'^category/(?P<category>[-\w]+)/$')
    def post_by_category(self, request, category, *args, **kwargs):
        self.filter_type = 'category'
        self.filter_term = category
        self.posts = self.get_posts().filter(categories__blog_category__slug=category)
        return self.render(request)

    @route(r"^(\d{4})/$")
    @route(r"^(\d{4})/(\d{2})/$")
    @route(r"^(\d{4})/(\d{2})/(\d{2})/$")
    def post_by_date(self, request, year, month=None, day=None, *args, **kwargs):
        self.filter_type = 'date'
        self.filter_term = year
        self.posts = self.get_posts().filter(post_date__year=year)
        if month:
            df = DateFormat(datetime.date(int(year), int(month), 1))
            self.filter_term = df.format('F Y')
            self.posts = self.posts.filter(post_date__month=month)
        if day:
            self.filter_term = date_format(datetime.date(int(year), int(month), int(day)))
            self.posts = self.posts.filter(post_date__day=day)
        return self.render(request)

    @route(r"^search/$")
    def post_search(self, request, *args, **kwargs):
        search_query = request.GET.get("q", None)
        self.posts = self.get_posts()
        if search_query:
            self.filter_term = search_query
            self.filter_type = 'search'
            self.posts = self.posts.search(search_query)
        return self.render(request)
Notes:
- We added
filter_termto make it represent thesearch keywords,categoryortag - We added
filter_typeto make it represent the filter type.
Update wagtail_app/templates/blog/blog_page.html
{% extends "base.html" %}

{% load wagtailcore_tags wagtailimages_tags blogapp_tags %}

{% block content %}

  {% if page.filter_term %}
    <div class="px-4 py-3 leading-normal text-blue-700 bg-blue-100 rounded-lg mb-4" role="alert">
      {{ page.filter_type }}: {{ page.filter_term }}
    </div>
  {% endif %}

    ...

{% endblock %}
Notes:
- If the
page.filter_termis not None, display the filter messages.
Wagtail Tutorial Series:
To learn more about Wagtail CMS, please check Build Blog With Wagtail CMS (4.0.0)
- Create Wagtail Project
- Modern Frontend Techs for Wagtail
- Dockerizing Wagtail App
- Add Blog Models to Wagtail
- How to write Wagtail page template
- Create Stylish Wagtail Pages with Tailwind CSS
- How to use StreamField in Wagtail
- Wagtail Routable Page
- Add Pagination Component to Wagtail
- Customize Wagtail Page URL
- Add Full Text Search to Wagtail
- Add Markdown Support to Wagtail
- Add LaTeX Support & Code Highlight In Wagtail
- How to Build Form Page in Wagtail
- How to Create and Manage Menus in Wagtail
- Wagtail SEO Guide
- Online Demo http://wagtail-blog.accordbox.com/
- Source code: https://github.com/AccordBox/wagtail-tailwind-blog
Wagtail Tips:
- Wagtail Tip #1: How to replace ParentalManyToManyField with InlinePanel
- Wagtail Tip #2: How to Export & Restore Wagtail Site
Write style in Wagtail:
- How to use SCSS/SASS in your Django project (Python Way)
- How to use SCSS/SASS in your Django project (NPM Way)
Other Wagtail Topics: