Wagtail Tutorial Series:
To learn more about Wagtail CMS, please check Build Blog With Wagtail CMS (4.0.0)
- Create Wagtail Project
- Modern Frontend Techs for Wagtail
- Dockerizing Wagtail App
- Add Blog Models to Wagtail
- How to write Wagtail page template
- Create Stylish Wagtail Pages with Tailwind CSS
- How to use StreamField in Wagtail
- Wagtail Routable Page
- Add Pagination Component to Wagtail
- Customize Wagtail Page URL
- Add Full Text Search to Wagtail
- Add Markdown Support to Wagtail
- Add LaTeX Support & Code Highlight In Wagtail
- How to Build Form Page in Wagtail
- How to Create and Manage Menus in Wagtail
- Wagtail SEO Guide
- Online Demo http://wagtail-blog.accordbox.com/
- Source code: https://github.com/AccordBox/wagtail-tailwind-blog
Wagtail Tips:
- Wagtail Tip #1: How to replace ParentalManyToManyField with InlinePanel
- Wagtail Tip #2: How to Export & Restore Wagtail Site
Write style in Wagtail:
- How to use SCSS/SASS in your Django project (Python Way)
- How to use SCSS/SASS in your Django project (NPM Way)
Other Wagtail Topics:
Introduction
Split Testing, also know as A/B testing, is a very important way to optimize the site conversion rate.
In this Wagtail tutorial, I will show you how to do Split Testing in Wagtail CMS. After reading this tutorial, you will:
- Learn how to use
wagtail-personalisationto setup A/B test in Wagtail. - Understand how
wagtail-personalisationwork. - Use
wagtail-experimentsto setup A/B test and conversion tracking. - Understand how
wagtail-experimentswork.
Solution 1: wagtail-personalisation
With wagtail-personalisation, editors can create customised pages based on some segments.
Install wagtail-personalisation
First, let's install wagtail-personalisation
$ pip install wagtail-personalisation
And then edit the settings.py, add the packages to the INSTALLED_APPS
INSTALLED_APPS = [
    'wagtail.contrib.modeladmin',            # this is required
    'wagtail_personalisation',               # new
    'wagtailfontawesome',                    # new
]
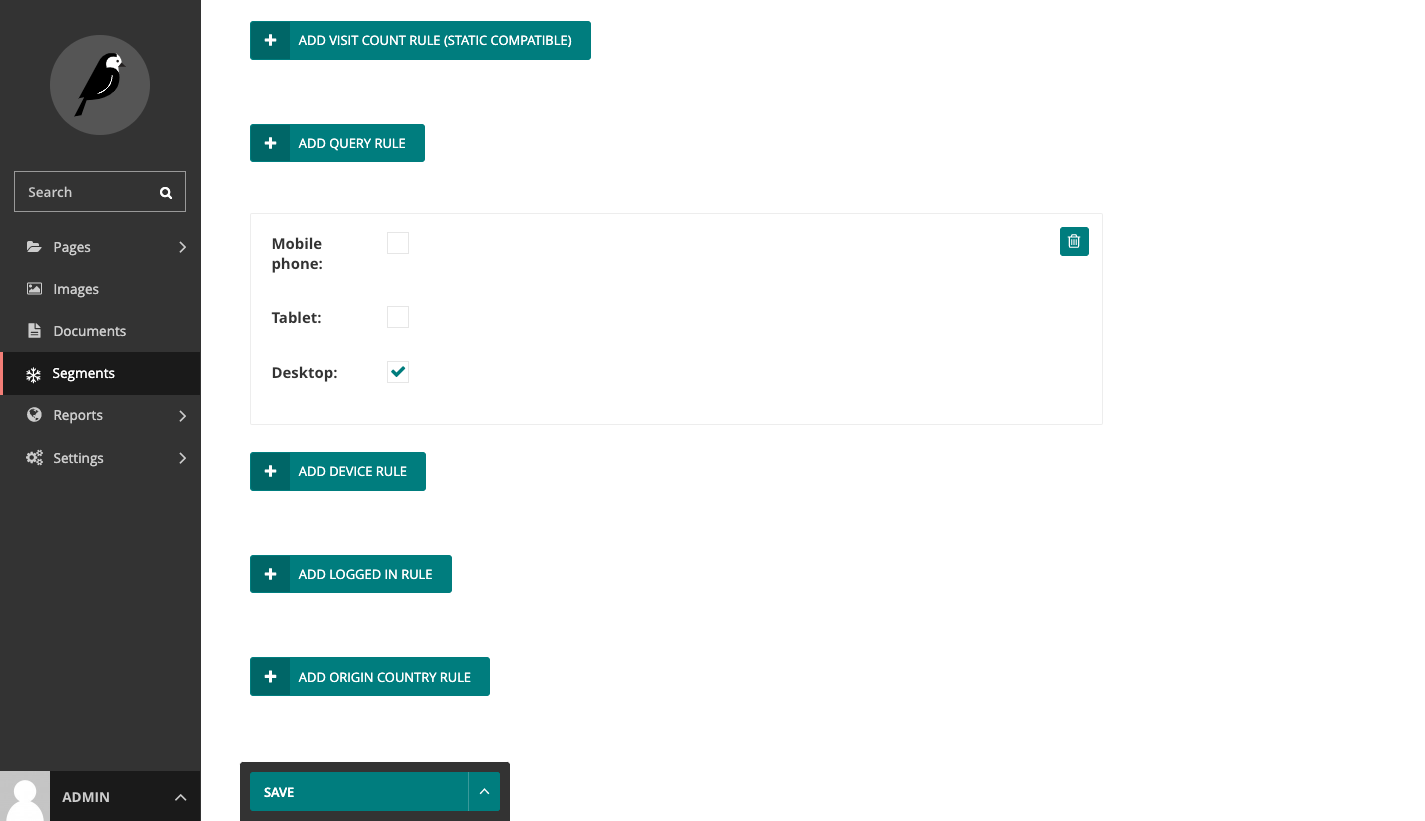
Create Segment
After we enter Wagtail admin, please click Segments in the sidebar and create segment
We can create many rules in the segment page.
For example, here we create a Desktop Segment
Page Model
from wagtail.core.models import Page

from wagtail_personalisation.models import PersonalisablePageMixin


class HomePage(PersonalisablePageMixin, Page):
    pass
To make page supports wagtail-personalisation we should add PersonalisablePageMixin and migrate the db
To add personalisable StreamField blocks, check official doc
Create Variant Page
Now we already create a segment, next, we can create a NEW page for the segment.
In wagtail-personalisation, this called Variant Page
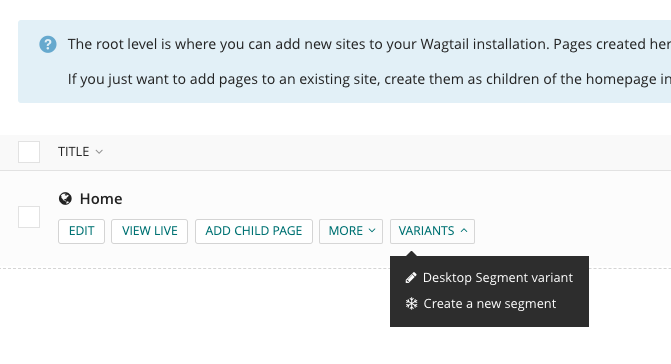
Here we create a page for the Desktop Segment variant segment.
To help us distinguish, I set the page title to Home (Desktop Segment)
So the page structures seem like this:
Home                          (normal page)
Home (Desktop Segment)        (variant page for the Desktop Segment)
Simple Test
Now, if I visit http://127.0.0.1:8000/ in the desktop browser, I will get Home in the HTML <title>
If I visit http://127.0.0.1:8000/ in the mobile browser (Chrome devtools can help), I will get Home (Desktop Segment) in the HTML <title>
How it works
Please check https://github.com/wagtail/wagtail-personalisation/blob/0.15.2/src/wagtail_personalisation/wagtail_hooks.py#L96
In the code, we can see
@hooks.register("before_serve_page")
def serve_variant(page, request, serve_args, serve_kwargs):
    user_segments = []
    if not isinstance(page, models.PersonalisablePageMixin):
        return

    adapter = get_segment_adapter(request)
    user_segments = adapter.get_segments()

    metadata = page.personalisation_metadata

    # If page is not canonical, don't serve it.
    if not metadata.is_canonical:
        raise Http404

    if user_segments:
        # TODO: This is never more then one page? (fix query count)
        metadata = metadata.metadata_for_segments(user_segments)
        if metadata:
            variant = metadata.first().variant.specific
            return variant.serve(request, *serve_args, **serve_kwargs)
When user visits some page, serve_variant will try to check if the page instance is PersonalisablePageMixin
Then it will try to find variant page from the segment, and serve if it is available.
Notes
variant page also exists with the normal pages, but have different pk
In some cases, you might need to exclude them from the queryset to avoid some bugs.
Please use exclude_variants in the wagtail_personalisation.utils
Solution 2: wagtail-experiments
Install wagtail-experiments
First, let's install wagtail-experiments in our Wagtail project.
$ pip install wagtail-experiments
And then edit the settings.py, add the packages to the INSTALLED_APPS, modeladmin is also needed here.
INSTALLED_APPS = [
    'wagtail.contrib.modeladmin',     # new
    'experiments',                    # new
]
After config is done, please migrate the database schema.
$ python manage.py migrate
$ python nmanage.py runserver
Setup A/B test in Wagtail admin
Let's assume you want to do some modification on your existing blog post, because you wish more people subscribe to your blog.
Here I will teach you how to do it in Wagtail admin.
Now you have one post welcome, we call it Page A, then you copied the page and make the new page(Page B) as a child of the Page A.
In this case, to make us better distinguish, the Page B have This is the alternative version in page body.
The only difference between Page A and Page B is the body content. You should not test many things at once because this might lead to the wrong conclusion.
So the page structure in your Wagtail project would seem like this.
Blog Home
    Welcome Page (Page A)
        Welcome-alternative (Page B)
    Contact Page
Let's assume if the reader visit Contact page after visiting Page A or Page B, we treat it a conversion.
Now let's setup A/B test in Wagtail admin.
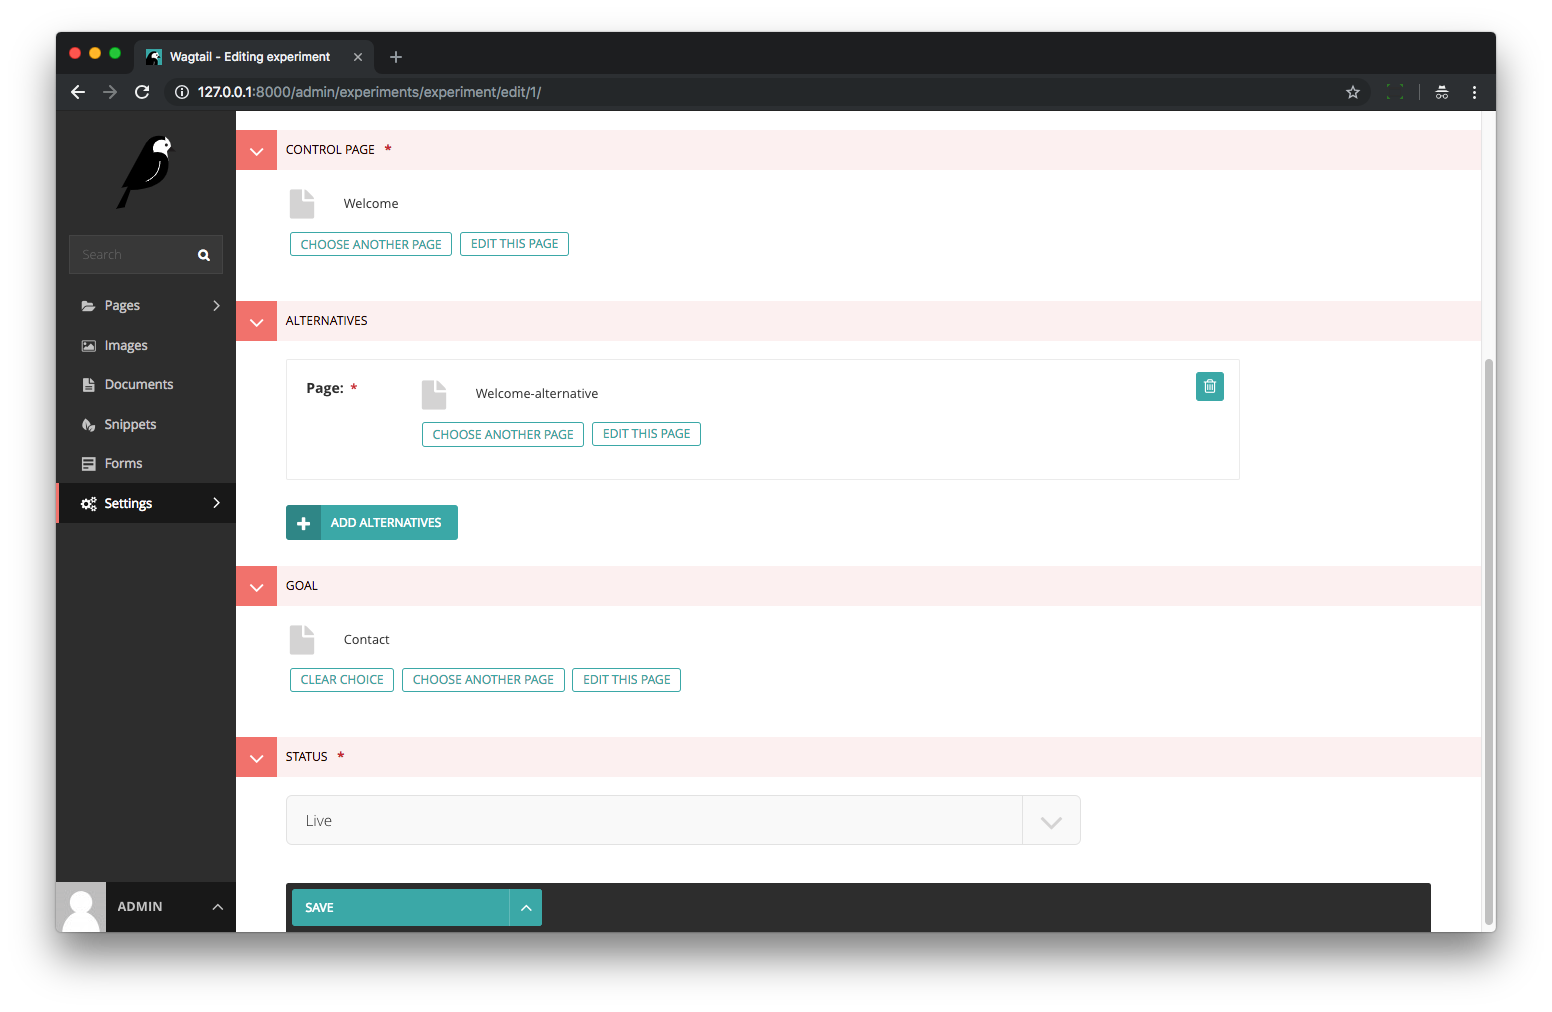
Go to settings/experiments,
- Set
Control pagetoWelcome Page, when reader visit this page url, thewagtail-experimentswould handle the request. - Set
AlternativestoWelcome-alternative, thewagtail-experimentswould pick one from this list to render it. - Set
GoaltoContact, if the reader visits thewelcomepage and thencontactpage, the wagtail would record the conversion. - Change the status to
liveto make this experiment take effect.
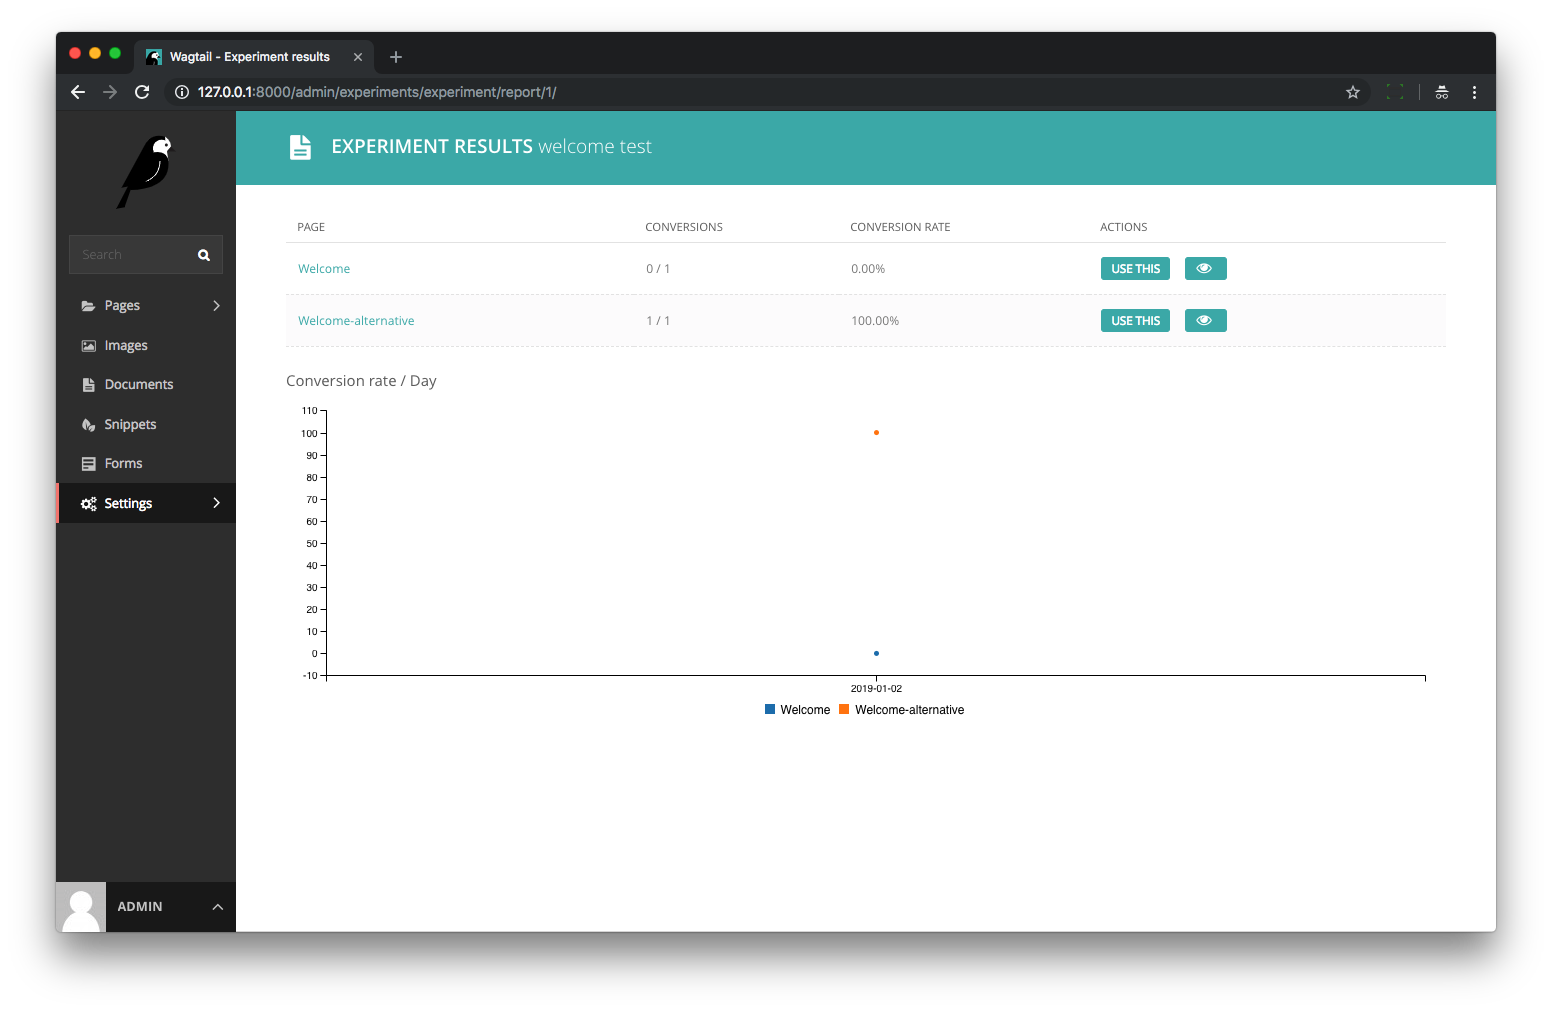
Check A/B test to see if it work
Now try to visit http://127.0.0.1:8000/blog/welcome/ in incognito window.
Here you might see the Page A or Page B, if you can not see the This is the alternative version in page content, just clear cookies and try again.

After you see the alternative page, click the contact link in the top menu to do a conversion.
Now go to wagtail admin settings/experiments/show report to check. Then you will see your conversion has been recorded.
How wagtail experiments work
Now you already have a basic understanding about how a/b test work in Wagtail, so let me give you more detail about how it works.
- When you visit the
http://127.0.0.1:8000/blog/welcome/,wagtail-experimentswould detect if there are any a/b test's control page is that page. - If it found a record, it would check which page to render based on the django session. That is why you can clear the cookie to make it start over again.
- When you visit the contact page,
wagtail-experimentswould detect if there are any a/b test's goal page is that page. - If it found a record and record does not conversion yet, it would set it conversion. Here you should know even you do conversion in one django session many times it would only record one conversion
Track conversion with JS
Sometimes, you want to record conversion using javascript, wagtail-experiments also support this feature.
Add code below to Django urls.py
from experiments import views as experiment_views

urlpatterns = [
    # ...
    url(r'^experiments/complete/([^/]+)/$', experiment_views.record_completion, name="experiments_complete"),
    # ...
]
<script>
  $(function() {
    $('form').on('submit', function (event) {
      event.preventDefault();
      var form = this;
      $.ajax({
        type: "GET",
        url: "{% url 'experiments_complete' experiment_slug %}",
        complete: function (obj) {
          form.submit();
        },
      });
    });
  });
</script>
You can use the js code above in your wagtail page template. experiment_slug should be config as page variable. When user submit form in that page, an ajax request would sent to wagtail experiments to record and then the form would be submitted. You can modify the code to make that work in your project.
Wagtail Tutorial Series:
To learn more about Wagtail CMS, please check Build Blog With Wagtail CMS (4.0.0)
- Create Wagtail Project
- Modern Frontend Techs for Wagtail
- Dockerizing Wagtail App
- Add Blog Models to Wagtail
- How to write Wagtail page template
- Create Stylish Wagtail Pages with Tailwind CSS
- How to use StreamField in Wagtail
- Wagtail Routable Page
- Add Pagination Component to Wagtail
- Customize Wagtail Page URL
- Add Full Text Search to Wagtail
- Add Markdown Support to Wagtail
- Add LaTeX Support & Code Highlight In Wagtail
- How to Build Form Page in Wagtail
- How to Create and Manage Menus in Wagtail
- Wagtail SEO Guide
- Online Demo http://wagtail-blog.accordbox.com/
- Source code: https://github.com/AccordBox/wagtail-tailwind-blog
Wagtail Tips:
- Wagtail Tip #1: How to replace ParentalManyToManyField with InlinePanel
- Wagtail Tip #2: How to Export & Restore Wagtail Site
Write style in Wagtail:
- How to use SCSS/SASS in your Django project (Python Way)
- How to use SCSS/SASS in your Django project (NPM Way)
Other Wagtail Topics: