Wagtail Tutorial Series:
To learn more about Wagtail CMS, please check Build Blog With Wagtail CMS (4.0.0)
- Create Wagtail Project
- Modern Frontend Techs for Wagtail
- Dockerizing Wagtail App
- Add Blog Models to Wagtail
- How to write Wagtail page template
- Create Stylish Wagtail Pages with Tailwind CSS
- How to use StreamField in Wagtail
- Wagtail Routable Page
- Add Pagination Component to Wagtail
- Customize Wagtail Page URL
- Add Full Text Search to Wagtail
- Add Markdown Support to Wagtail
- Add LaTeX Support & Code Highlight In Wagtail
- How to Build Form Page in Wagtail
- How to Create and Manage Menus in Wagtail
- Wagtail SEO Guide
- Online Demo http://wagtail-blog.accordbox.com/
- Source code: https://github.com/AccordBox/wagtail-tailwind-blog
Wagtail Tips:
- Wagtail Tip #1: How to replace ParentalManyToManyField with InlinePanel
- Wagtail Tip #2: How to Export & Restore Wagtail Site
Write style in Wagtail:
- How to use SCSS/SASS in your Django project (Python Way)
- How to use SCSS/SASS in your Django project (NPM Way)
Other Wagtail Topics:
Objective
By the end of this chapter, you should be able to:
- Understand how
FormBuilderworks and how to use it to build contact page in Wagtail project. - Learn how to make
FormBuilderwork with Tailwind CSS usingdjango-crispy-forms
UPDATE: crispy-tailwind is not recommended anymore, please check django-formify, which seamlessly integrates Tailwind CSS styles into your Django forms for a modern look.
tailwindcss-forms
tailwindcss/forms is a plugin that provides a basic reset for form styles that makes form elements easy to override with utilities.
$ npm install @tailwindcss/forms
In the package.json, we can see
"@tailwindcss/forms": "^0.5.3",
Update tailwind.config.js to use the plugin.
module.exports = {
  //
  plugins: [
    // ...
    require('@tailwindcss/forms'),                // new
  ],
}
Now the default form style would look better, let's keep moving.
Setup
Update requirements.txt
wagtail-django-recaptcha==1.0
django-crispy-forms==1.14.0
crispy-tailwind==0.5.0
$ docker-compose up -d --build
$ docker-compose logs -f
- Add
crispy_forms,crispy_tailwind,captcha, andwagtailcaptchato theINSTALLED_APPSin wagtail_app/settings.py - Please make sure
wagtail.contrib.formsalready exists inINSTALLED_APPS
INSTALLED_APPS = [
    # code omitted for brevity

    'captcha',
    'wagtailcaptcha',
    'crispy_forms',
    'crispy_tailwind',
]
Put this at the bottom of wagtail_app/settings.py
CRISPY_ALLOWED_TEMPLATE_PACKS = "tailwind"
CRISPY_TEMPLATE_PACK = "tailwind"
Here we tell cripsy-form to render form with tailwind layout.
Add code below to wagtail_app/settings.py
# DO NOT use on production, test key is available in the URL below
# https://developers.google.com/recaptcha/docs/faq
RECAPTCHA_PUBLIC_KEY = "6LeIxAcTAAAAAJcZVRqyHh71UMIEGNQ_MXjiZKhI"
RECAPTCHA_PRIVATE_KEY = "6LeIxAcTAAAAAGG-vFI1TnRWxMZNFuojJ4WifJWe"
NOCAPTCHA = True
SILENCED_SYSTEM_CHECKS = ["captcha.recaptcha_test_key_error"]
The config would help make recaptcha work in dev mode.
Model
Update wagtail_app/blog/models.py to add new models below.
from wagtail.contrib.forms.models import AbstractEmailForm, AbstractFormField
from wagtailcaptcha.models import WagtailCaptchaEmailForm
from wagtail.core.fields import StreamField, RichTextField
from django.utils.functional import cached_property
from wagtail.admin.edit_handlers import FieldPanel, InlinePanel, MultiFieldPanel, FieldRowPanel


class FormField(AbstractFormField):
    page = ParentalKey('FormPage', on_delete=models.CASCADE, related_name='form_fields')


class FormPage(WagtailCaptchaEmailForm):
    thank_you_text = RichTextField(blank=True)

    content_panels = AbstractEmailForm.content_panels + [
        InlinePanel("form_fields", label="Form fields"),
        FieldPanel("thank_you_text", classname="full"),
        MultiFieldPanel(
            [
                FieldRowPanel(
                    [
                        FieldPanel("from_address", classname="col6"),
                        FieldPanel("to_address", classname="col6"),
                    ]
                ),
                FieldPanel("subject"),
            ],
            "Email Notification Config",
        ),
    ]

    @cached_property
    def blog_page(self):
        return self.get_parent().specific

    def get_context(self, request, *args, **kwargs):
        context = super(FormPage, self).get_context(request, *args, **kwargs)
        context["blog_page"] = self.blog_page
        return context
Notes:
- We created
FormFieldto store meta data of the form fields. FormPageinherit from theWagtailCaptchaEmailForm, which support email sending after submission and Google reCAPTCHA validation.from_address,to_address, andsubject, these fields are used to send email notificationthank_you_texthere is used to store the thanks message after submission submitted.- Please also remember to make
blog_pageavailable in the context, so widgets in the sidebar can work.
# migrate the db
$ docker-compose run --rm web python manage.py makemigrations
$ docker-compose run --rm web python manage.py migrate
Template
Create wagtail_app/templates/blog/form_page.html
{% extends "base.html" %}
{% load wagtailcore_tags crispy_forms_tags %}

{% block content %}

  <h1>Contact</h1>
  <br>

  {% comment %}
    mb-3 mb-2 appearance-none leading-normal block border py-2 focus:outline-none border-gray-300 bg-white w-full px-4 text-gray-700 rounded-lg
    For better solution, please check https://www.accordbox.com/blog/render-django-form-with-tailwind-css-style/
  {% endcomment %}

  <form action="{% pageurl page %}" method="POST" >
    {% csrf_token %}
    {{ form|crispy }}
    <button type="submit" class="bg-blue-500 hover:bg-blue-600 text-white py-2 px-4 rounded-lg" >Submit</button>
  </form>

{% endblock %}
Notes:
- Here we use Django Template inheritance
{% extends "base.html" %} {{ form|crispy }}would call cripsy form to render the form withtailwindlayout (which we config inCRISPY_TEMPLATE_PACK)- The
css classesin the templatecommentblock are to let tailwind know which css classes are used by the form, I recommend you to check https://www.accordbox.com/blog/render-django-form-with-tailwind-css-style/ to get a better solution.
Create wagtail_app/templates/blog/form_page_landing.html, this template would be used to render success message after form submission.
{% extends "base.html" %}

{% load static wagtailcore_tags %}

{% block content %}

<div class="p-4 mb-4 text-sm text-green-700 bg-green-100 rounded-lg" role="alert">
  {{ page.thank_you_text|richtext }}
</div>

{% endblock %}
Email Test Env
To make us can check email notification sent by Wagtail in local dev environment, update wagtail_app/settings.py
EMAIL_BACKEND = 'django.core.mail.backends.console.EmailBackend'
The code above make Django print the Email message to our console, which make us easy to debug.
Manual Test
# restart just in case web dev server has exit
$ docker-compose up -d
$ docker-compose logs -f
Create a FormPage which has contact slug as child of the BlogPage, and add some form fields.
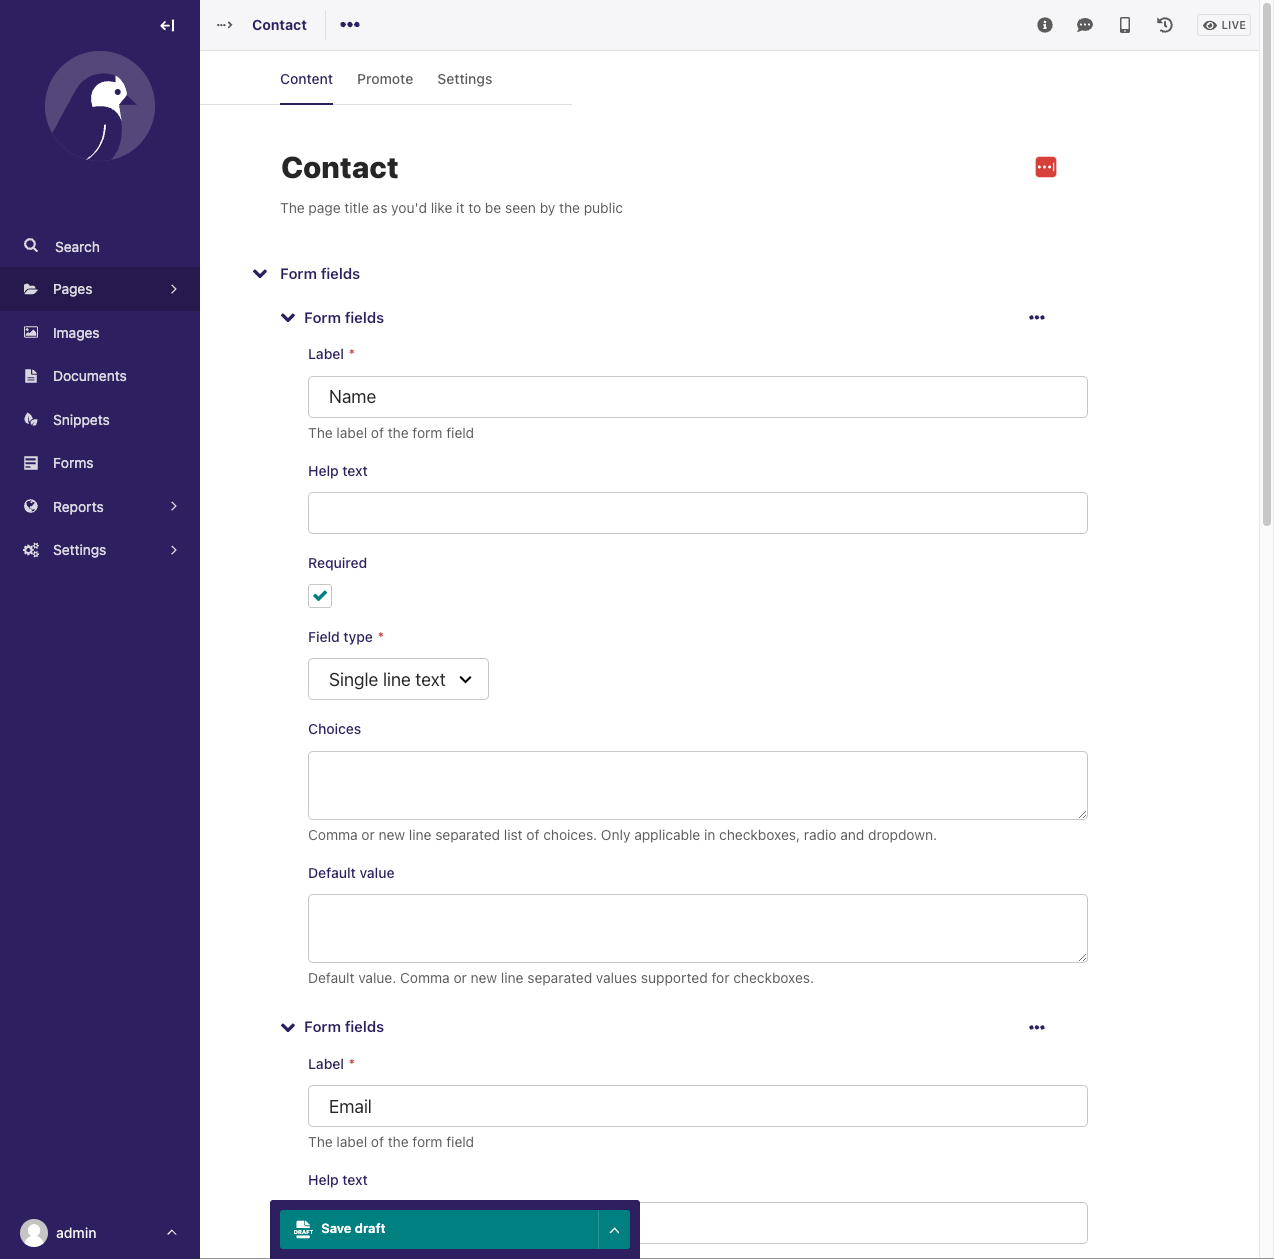
As you can see, it is very flexible, People who have no coking skill can also create form page, in free way.
Next, let's test the form on http://127.0.0.1:8000/contact/
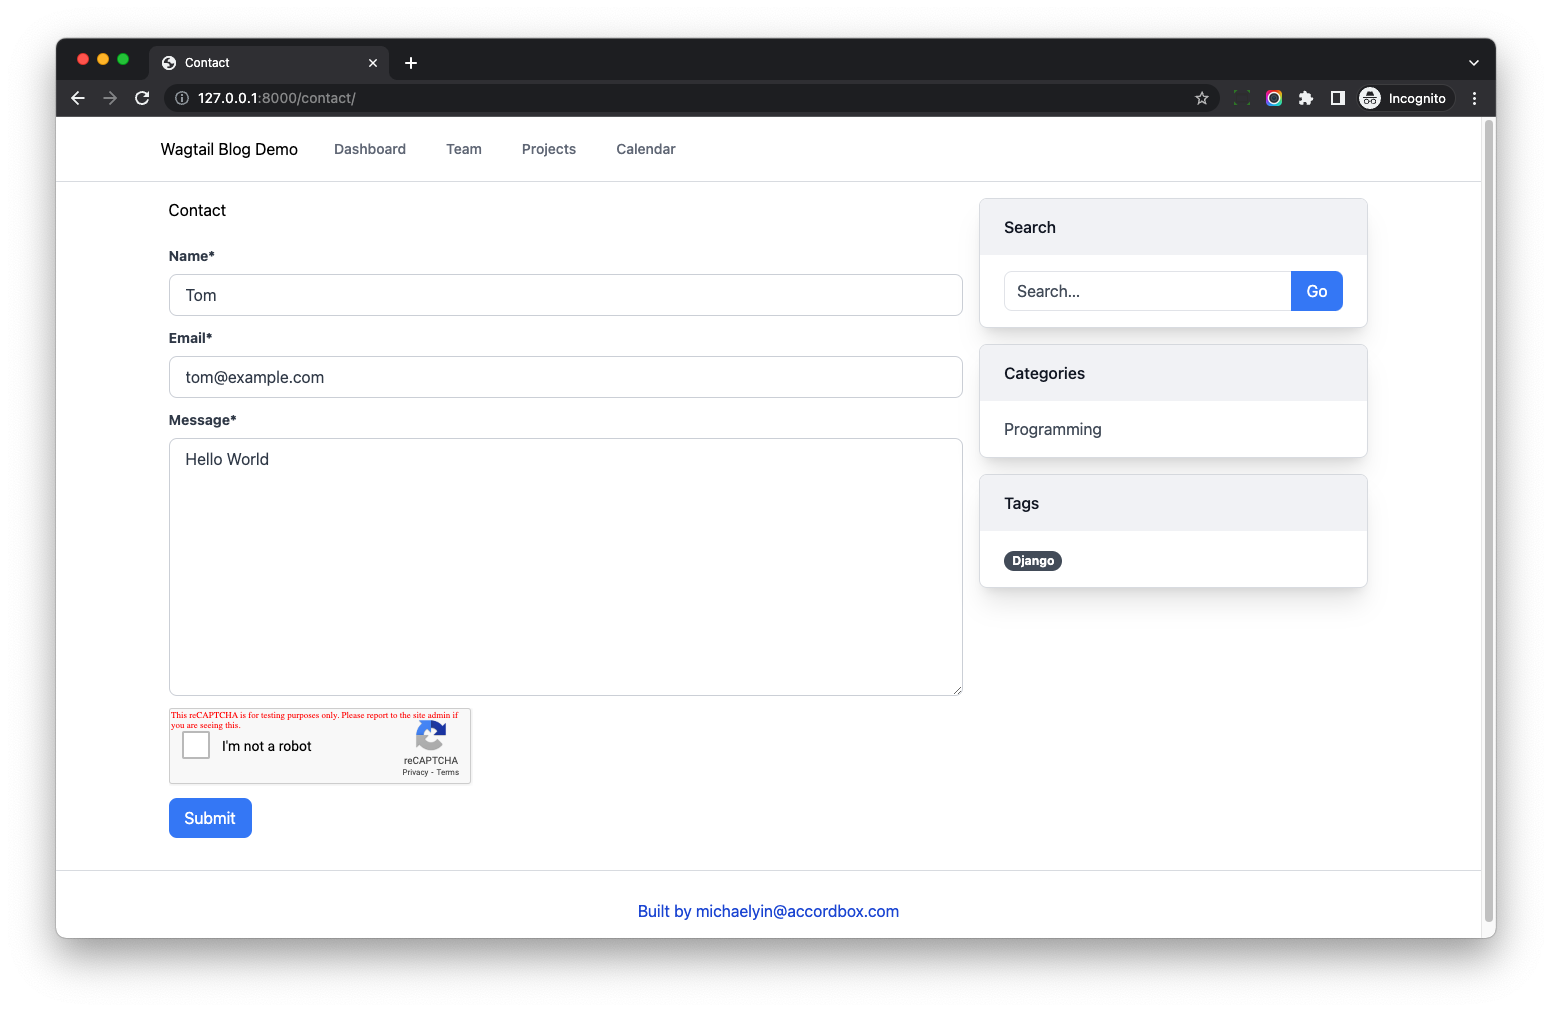
After I click the submit, I can see the success message.
web_1  | Content-Type: text/plain; charset="utf-8"
web_1  | MIME-Version: 1.0
web_1  | Content-Transfer-Encoding: 7bit
web_1  | Subject: Contact Message
web_1  | From: [email protected]
web_1  | To: [email protected]
web_1  | Date: Fri, 21 Oct 2022 14:07:18 -0000
web_1  | Message-ID: <166636123839.10.13444404769866612605@ea9465a5052c>
web_1  | Auto-Submitted: auto-generated
web_1  |
web_1  | Name: Tom
web_1  | Email: [email protected]
web_1  | Message: Hello World
You can also check the form submissions in Wagtail admin/forms and export it as CSV.
Email Reply
Some people like to reply the email notification in Gmail or some 3-party customer service app such as Zendesk.
How to make it work with Wagtail form page?
Let's take a look at this example
- Our Wagtail project send email from
[email protected], which is thefrom_address - Susan, the admin of the Wagtail project has personal email
[email protected], which is theto_address - Now a visitor submit submission using the email
[email protected].
The email headers would seem like this
| Subject: Contact Message
| From: [email protected]
| To: [email protected]
If Susan reply email, she will notice the email will sent back to [email protected], however, this is not the correct and Rebecca will never receive the reply.
Reply-To can help us here.
A Reply-To address is identified by inserting the Reply-To header in your email. It is the email address that the reply message is sent when you want the reply to go to an email address that is different than the From: address.
We should make the email headers like this
| Subject: Contact Message
| From: [email protected]
| To: [email protected]
| Reply-To: [email protected]
So other email services can understand it and the email reply can work as expected.
We can override the send_mail in FormPage to make this work, code below can help you.
from django.core.mail import EmailMessage

email = EmailMessage(
    subject,
    content,
    from_address,
    to_address,
    reply_to=[form['email'].data],
)
Notes:
- If you want to build Multi-step form, you can check snippet in Wagtail doc
- If you want the form work with
StreamField, you can cehck wagtailstreamforms - If you want a more powerful multi-step form, you can check wagtail-flexible-forms (This project has no good doc but you can check the source code)
Wagtail Tutorial Series:
To learn more about Wagtail CMS, please check Build Blog With Wagtail CMS (4.0.0)
- Create Wagtail Project
- Modern Frontend Techs for Wagtail
- Dockerizing Wagtail App
- Add Blog Models to Wagtail
- How to write Wagtail page template
- Create Stylish Wagtail Pages with Tailwind CSS
- How to use StreamField in Wagtail
- Wagtail Routable Page
- Add Pagination Component to Wagtail
- Customize Wagtail Page URL
- Add Full Text Search to Wagtail
- Add Markdown Support to Wagtail
- Add LaTeX Support & Code Highlight In Wagtail
- How to Build Form Page in Wagtail
- How to Create and Manage Menus in Wagtail
- Wagtail SEO Guide
- Online Demo http://wagtail-blog.accordbox.com/
- Source code: https://github.com/AccordBox/wagtail-tailwind-blog
Wagtail Tips:
- Wagtail Tip #1: How to replace ParentalManyToManyField with InlinePanel
- Wagtail Tip #2: How to Export & Restore Wagtail Site
Write style in Wagtail:
- How to use SCSS/SASS in your Django project (Python Way)
- How to use SCSS/SASS in your Django project (NPM Way)
Other Wagtail Topics: