Wagtail Tutorial Series:
To learn more about Wagtail CMS, please check Build Blog With Wagtail CMS (4.0.0)
- Create Wagtail Project
- Modern Frontend Techs for Wagtail
- Dockerizing Wagtail App
- Add Blog Models to Wagtail
- How to write Wagtail page template
- Create Stylish Wagtail Pages with Tailwind CSS
- How to use StreamField in Wagtail
- Wagtail Routable Page
- Add Pagination Component to Wagtail
- Customize Wagtail Page URL
- Add Full Text Search to Wagtail
- Add Markdown Support to Wagtail
- Add LaTeX Support & Code Highlight In Wagtail
- How to Build Form Page in Wagtail
- How to Create and Manage Menus in Wagtail
- Wagtail SEO Guide
- Online Demo http://wagtail-blog.accordbox.com/
- Source code: https://github.com/AccordBox/wagtail-tailwind-blog
Wagtail Tips:
- Wagtail Tip #1: How to replace ParentalManyToManyField with InlinePanel
- Wagtail Tip #2: How to Export & Restore Wagtail Site
Write style in Wagtail:
- How to use SCSS/SASS in your Django project (Python Way)
- How to use SCSS/SASS in your Django project (NPM Way)
Other Wagtail Topics:
Objectives
By the end of this chapter, you should be able to:
- Add blog models and understand how it works.
- Learn how to run code and check data in the Django shell.
Page structure
Let's look at the page structures before we start, which can help us better understand the next sections.
There would be two page types in our project, BlogPage and PostPage
BlogPage would be the index page of the PostPage
So the page structures would seem like this.
BlogPage
    PostPage1
    PostPage2
    PostPage3
    PostPage4
Create Blog App
Let's create a Django app blog
$ mkdir -p ./wagtail_app/blog
$ docker-compose run --rm web python manage.py startapp blog wagtail_app/blog
We will have structure like this:
wagtail_app
├── __init__.py
├── asgi.py
├── blog
│   ├── __init__.py
│   ├── admin.py
│   ├── apps.py
│   ├── migrations
│   │   └── __init__.py
│   ├── models.py
│   ├── tests.py
│   └── views.py
├── settings.py
├── templates
├── urls.py
└── wsgi.py
Update wagtail_app/blog/apps.py to change the name to wagtail_app.blog
from django.apps import AppConfig


class BlogConfig(AppConfig):
    default_auto_field = 'django.db.models.BigAutoField'
    name = 'wagtail_app.blog'
Add wagtail_app.blog to the INSTALLED_APPS in wagtail_app/settings.py
INSTALLED_APPS = [
    ...
    'wagtail_app.blog',                  # new
]
$ docker-compose run --rm web python manage.py check
Page Models
Next, let's start adding blog models, there are mainly two types of models we need to add here.
- Page models (
BlogPage,PostPage) - Other models (
Category,Tag)
wagtail_app/blog/models.py
from django.db import models
from wagtail.core.models import Page
from wagtail.admin.edit_handlers import FieldPanel


class BlogPage(Page):
    pass


class PostPage(Page):
    header_image = models.ForeignKey(
        "wagtailimages.Image",
        null=True,
        blank=True,
        on_delete=models.SET_NULL,
        related_name="+",
    )

    content_panels = Page.content_panels + [
        FieldPanel("header_image"),
    ]
Notes:
- When we create page models, please make sure all page classes inherit from the Wagtail
Pageclass. - Here we add a
header_imagefield to thePostPage. - We should also add edit handlers to the
content_panelsso we can edit the fields in Wagtail admin.
Category and Tag
To make the blog supports Category and Tag features, let's add some models.
wagtail_app/blog/models.py
from django.db import models
from wagtail.snippets.models import register_snippet
from taggit.models import Tag as TaggitTag


@register_snippet
class BlogCategory(models.Model):
    name = models.CharField(max_length=255)
    slug = models.SlugField(unique=True, max_length=80)

    panels = [
        FieldPanel("name"),
        FieldPanel("slug"),
    ]

    def __str__(self):
        return self.name

    class Meta:
        verbose_name = "Category"
        verbose_name_plural = "Categories"


@register_snippet
class Tag(TaggitTag):
    class Meta:
        proxy = True
Notes:
- Here we created two models, both of them inherit from the standard Django models.Model
register_snippetdecorator will register the models as Wagtail snippets, that can make us add/edit/delete the model instances insnippetsof Wagtail admin.- Since Wagtail already has
tagsupport built ondjango-taggit, so here we create a proxy-model to declare it aswagtail snippet
Intermediary model
Now page models and snippet models are already defined. But we still need to create Intermediary models so the connections between them can be stored in the db.
from modelcluster.fields import ParentalKey
from taggit.models import TaggedItemBase

class PostPageBlogCategory(models.Model):
    page = ParentalKey(
        "blog.PostPage", on_delete=models.CASCADE, related_name="categories"
    )
    blog_category = models.ForeignKey(
        "blog.BlogCategory", on_delete=models.CASCADE, related_name="post_pages"
    )

    panels = [
        FieldPanel("blog_category"),
    ]

    class Meta:
        unique_together = ("page", "blog_category")


class PostPageTag(TaggedItemBase):
    content_object = ParentalKey("PostPage", related_name="post_tags")
Notes:
PostPageBlogCategoryis to store the connection betweenPostPageandCategory- Please remember to use
ParentalKeyinstead ofmodels.ForeignKey, I will talk about it in a bit. unique_together = ("page", "blog_category")would adddb constraintsto avoid duplicate records. You can check Django unique_together to learn more.- Some online resources teach people to use
ParentalManyToManyField, I do not recommend useParentalManyToManyFieldin Wagtail app even it seems more easy to understand. You can check this Wagtail tip for more details.
Next, let's update the PostPage model so we can add/edit/remove Category and Tag for the page in Wagtail admin.
from wagtail.admin.edit_handlers import FieldPanel, InlinePanel
from modelcluster.tags import ClusterTaggableManager


class PostPage(Page):
    header_image = models.ForeignKey(
        "wagtailimages.Image",
        null=True,
        blank=True,
        on_delete=models.SET_NULL,
        related_name="+",
    )

    tags = ClusterTaggableManager(through="blog.PostPageTag", blank=True)

    content_panels = Page.content_panels + [
        FieldPanel("header_image"),
        InlinePanel("categories", label="category"),
        FieldPanel("tags"),
    ]
Notes:
- For tag support, We add
ClusterTaggableManagerand usethroughto specify the intermediary model we just created. - For category support, add
InlinePanel("categories", label="category")to thecontent_panels. Thecategoriesrelationship is already defined inPostPageBlogCategory.page.related_name - The
PostPageBlogCategory.panelsdefines the behavior inInlinePanel, which means we can set multipleblog_categorywhen we create or edit page.
Source Code
Below is the full code of the wagtail_app/blog/models.py for reference
from django.db import models
from wagtail.core.models import Page
from wagtail.admin.edit_handlers import FieldPanel, InlinePanel
from wagtail.snippets.models import register_snippet
from taggit.models import Tag as TaggitTag
from modelcluster.fields import ParentalKey
from taggit.models import TaggedItemBase
from modelcluster.tags import ClusterTaggableManager


class BlogPage(Page):
    pass


class PostPage(Page):
    header_image = models.ForeignKey(
        "wagtailimages.Image",
        null=True,
        blank=True,
        on_delete=models.SET_NULL,
        related_name="+",
    )

    tags = ClusterTaggableManager(through="blog.PostPageTag", blank=True)

    content_panels = Page.content_panels + [
        FieldPanel("header_image"),
        InlinePanel("categories", label="category"),
        FieldPanel("tags"),
    ]


@register_snippet
class BlogCategory(models.Model):
    name = models.CharField(max_length=255)
    slug = models.SlugField(unique=True, max_length=80)

    panels = [
        FieldPanel("name"),
        FieldPanel("slug"),
    ]

    def __str__(self):
        return self.name

    class Meta:
        verbose_name = "Category"
        verbose_name_plural = "Categories"


@register_snippet
class Tag(TaggitTag):
    class Meta:
        proxy = True


class PostPageBlogCategory(models.Model):
    page = ParentalKey(
        "blog.PostPage", on_delete=models.CASCADE, related_name="categories"
    )
    blog_category = models.ForeignKey(
        "blog.BlogCategory", on_delete=models.CASCADE, related_name="post_pages"
    )

    panels = [
        FieldPanel("blog_category"),
    ]

    class Meta:
        unique_together = ("page", "blog_category")


class PostPageTag(TaggedItemBase):
    content_object = ParentalKey("PostPage", related_name="post_tags")
Migrate DB
After we finish the models part, let's migrate our db so db tables would be created or migrated.
$ docker-compose run --rm web python manage.py makemigrations
$ docker-compose run --rm web python manage.py migrate
Setup The Site
# create superuser and password
$ docker-compose run --rm web python manage.py createsuperuser

$ docker-compose up -d

# tail the log
$ docker-compose logs -f
Notes:
- Login on http://127.0.0.1:8000/cms/
- Go to http://127.0.0.1:8000/cms/pages/ to create
BlogPagebeside theWelcome to your new Wagtail site!page. You can click button in the top navbar to do this. - Follow
settings/sitein the sidebar to change theroot pageof thelocalhostsite to theBlogPagewe just created. - Go to http://127.0.0.1:8000/cms/pages/ delete the default welcome page.
- Now if we visit http://127.0.0.1:8000/ we will see
TemplateDoesNotExistexception. This is correct and we will fix it later, do not worry.
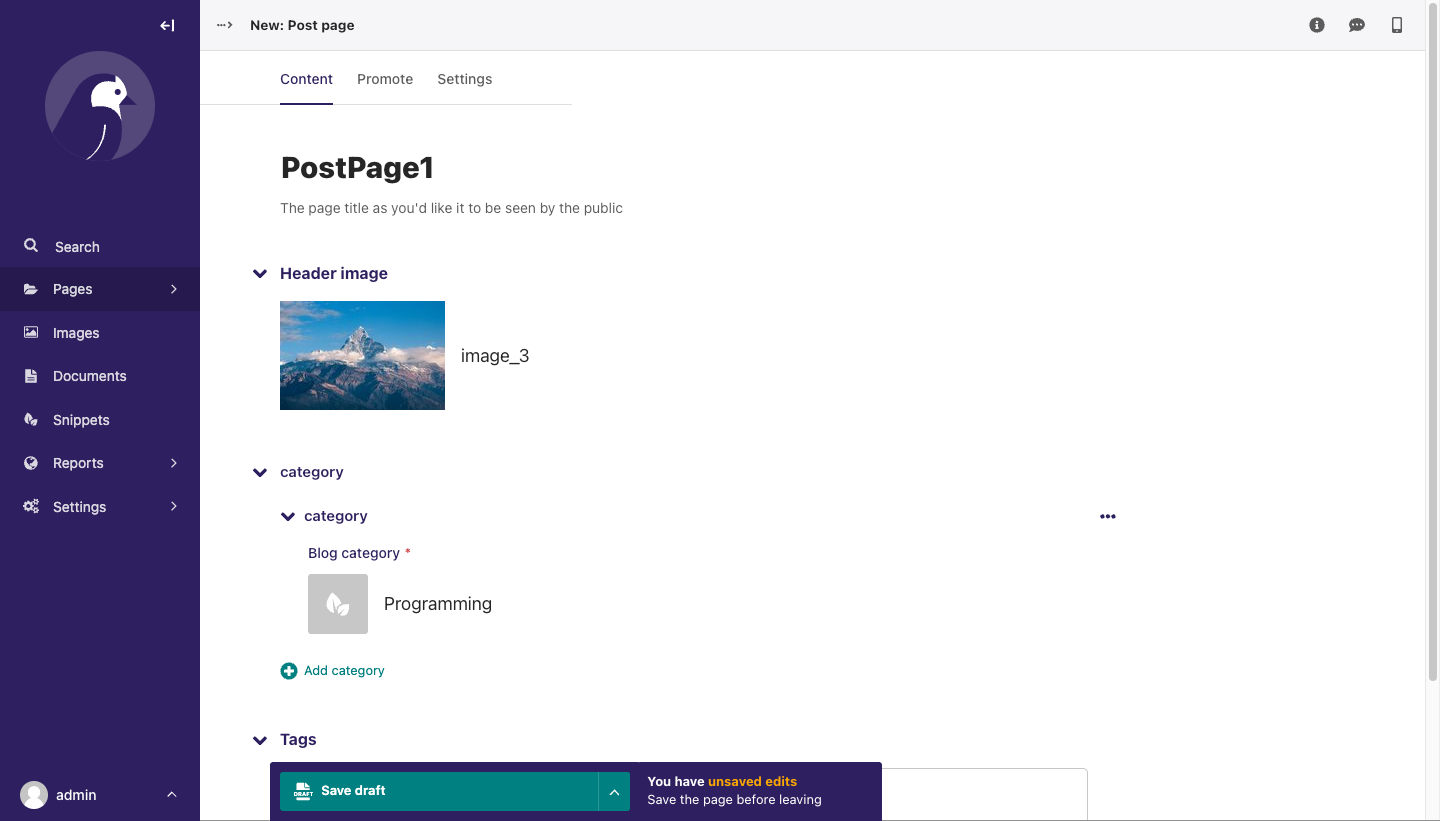
Add PostPage
- Follow
Pages/BlogPagein the sidebar (not the edit icon) - Click the top
Add child pagebutton to start addingPostPageas children of theBlogPage - You can create Category and Tag when you create the
PostPage - Remember to publish the page after you edit the page.
Simple Test
# please run code in new Django shell if you change something
$ docker-compose run --rm web python manage.py shell
Now you are in Django shell, and you can run some Python code to quickly check the data and code. This is very useful during the development.
>>> from wagtail.core.models import Page

# number 4 is the post page primary key we just created
# you can get it from the url when on the edit page
>>> page = Page.objects.get(pk=4).specific
>>> page.title
'PostPage1'
>>> page.tags.all()
[<Tag: Django>]
>>> page.categories.all()
<QuerySet [<PostPageBlogCategory: PostPageBlogCategory object (1)>]>
>>> page.categories.first().blog_category
<BlogCategory: Programming>
ParentalKey
Here I'd like to talk about a little more about the ParentalKey and the difference between with ForeignKey
Let's assume you are building a CMS framework which support preview feature, and now you have a live post page which has category category 1
So in the db table, the data would seem like this.
PostPage: postpage 1 (pk=1)

BlogCategory: category 1 (pk=1)

PostPageBlogCategory (pk=1, blog_category=1, page=1)
Now some editor wants to change the page category to category 2, and he even wants to preview it before publishing it. So what is your solution?
- You need to create something like
PostPageBlogCategory (blog_category=2, page=1)inmemoryand not write it toPostPageBlogCategorytable. (Because if you do, it will affect theliveversion of the page) - You need to write code to convert the page data, and the
PostPageBlogCategoryto some serialize format (JSON for example), and save it to somerevisiontable as the latest revision. - On the preview page, fetch the data from the
revisiontable and deserialize to a normal page object, and then render it to HTML.
Unfortunately, Django's ForeignKey can not work in this case, because it needs PostPageBlogCategory (blog_category=2, page=1) to save to db first, so it has pk
That is why django-modelcluster is created and ParentalKey is introduced.
Now we can solve the above problem in this way.
- Make the
PostPageinherit frommodelcluster.models.ClusterableModel. Actually, Wagtail Page class already did this - And define the
PostPageBlogCategory.pageasParentalKeyfield. - So the Wagtail page (
ClusterableModel) can detect and hold thePostPageCategoryin memory even it is not created in db yet. (hasnullpk) - We can then serialize the page to JSON format (which contains
PostPageBlogCategoryinfo) and save torevisiontable. - Now editor can preview the page without touching the live version.
If you want to dive deeper, try to use code below to check on your local:
>>> from wagtail.core.models import Revision
# page__pk is the primary key of the page
>>> revision = Revision.objects.filter(content_type__model='postpage').filter(object_id=page__pk).first()
>>> revision.content

{'pk': 4, 'live': True, 'path': '000100020001', 'slug': 'postpage1', 'depth': 3, 'owner': 1, 'title': 'PostPage1', 'locale': 1, 'locked': False, 'expired': False, 'alias_of': None, 'numchild': 0, 'url_path': '/blogpage/postpage1/', 'expire_at': None, 'locked_at': None, 'locked_by': None, 'post_tags': [{'pk': 1, 'tag': 1, 'content_object': 4}], 'seo_title': '', 'categories': [{'pk': 1, 'page': 4, 'blog_category': 1}], 'go_live_at': None, 'draft_title': 'PostPage1', 'content_type': 47, 'header_image': 3, 'live_revision': None, 'show_in_menus': False, 'latest_revision': None, 'translation_key': '84e6b2b2-5c26-4f20-a3fe-c5985081ac3c', 'last_published_at': None, 'first_published_at': None, 'search_description': '', 'wagtail_admin_comments': [], 'has_unpublished_changes': False, 'latest_revision_created_at': None}
So below are tips:
- If you define some
ForeignKeyrelationship withPageinPageclass, for examplePostPage.header_image, useForeignKey. (This has no the above problem) - If you define some
ForeignKeyrelationship withPageinotherclass, for example,PostPageCategory.page, useParentalKey.
Wagtail Tutorial Series:
To learn more about Wagtail CMS, please check Build Blog With Wagtail CMS (4.0.0)
- Create Wagtail Project
- Modern Frontend Techs for Wagtail
- Dockerizing Wagtail App
- Add Blog Models to Wagtail
- How to write Wagtail page template
- Create Stylish Wagtail Pages with Tailwind CSS
- How to use StreamField in Wagtail
- Wagtail Routable Page
- Add Pagination Component to Wagtail
- Customize Wagtail Page URL
- Add Full Text Search to Wagtail
- Add Markdown Support to Wagtail
- Add LaTeX Support & Code Highlight In Wagtail
- How to Build Form Page in Wagtail
- How to Create and Manage Menus in Wagtail
- Wagtail SEO Guide
- Online Demo http://wagtail-blog.accordbox.com/
- Source code: https://github.com/AccordBox/wagtail-tailwind-blog
Wagtail Tips:
- Wagtail Tip #1: How to replace ParentalManyToManyField with InlinePanel
- Wagtail Tip #2: How to Export & Restore Wagtail Site
Write style in Wagtail:
- How to use SCSS/SASS in your Django project (Python Way)
- How to use SCSS/SASS in your Django project (NPM Way)
Other Wagtail Topics: