Wagtail Tutorial Series:
To learn more about Wagtail CMS, please check Build Blog With Wagtail CMS (4.0.0)
- Create Wagtail Project
- Modern Frontend Techs for Wagtail
- Dockerizing Wagtail App
- Add Blog Models to Wagtail
- How to write Wagtail page template
- Create Stylish Wagtail Pages with Tailwind CSS
- How to use StreamField in Wagtail
- Wagtail Routable Page
- Add Pagination Component to Wagtail
- Customize Wagtail Page URL
- Add Full Text Search to Wagtail
- Add Markdown Support to Wagtail
- Add LaTeX Support & Code Highlight In Wagtail
- How to Build Form Page in Wagtail
- How to Create and Manage Menus in Wagtail
- Wagtail SEO Guide
- Online Demo http://wagtail-blog.accordbox.com/
- Source code: https://github.com/AccordBox/wagtail-tailwind-blog
Wagtail Tips:
- Wagtail Tip #1: How to replace ParentalManyToManyField with InlinePanel
- Wagtail Tip #2: How to Export & Restore Wagtail Site
Write style in Wagtail:
- How to use SCSS/SASS in your Django project (Python Way)
- How to use SCSS/SASS in your Django project (NPM Way)
Other Wagtail Topics:
Introduction
Wagtail CMS is a very good option if you want to build a dynamic landing page application.
- The
Streamfieldfeature of Wagtail can let you customize your data model to fit the design. - The
FormBuilderfeature of Wagtail can let you build a flexible and powerful form to collect data. - Wagtail CMS is based on Django, which means you can use 3-party apps of the ecosystem to extend its feature easily.
In this Wagtail CMS tutorial, I will teach you how to build a simple landing page using Wagtail, we would let the editor can control data displayed on landing page in Wagtail admin.
startbootstrap-freelancer is the landing page theme here because it is based on bootstrap so it would be easy to modify or extend the theme.
Note: source code of this tutorial is available at wagtail-freelancer
Analyze the landing page template, build data models
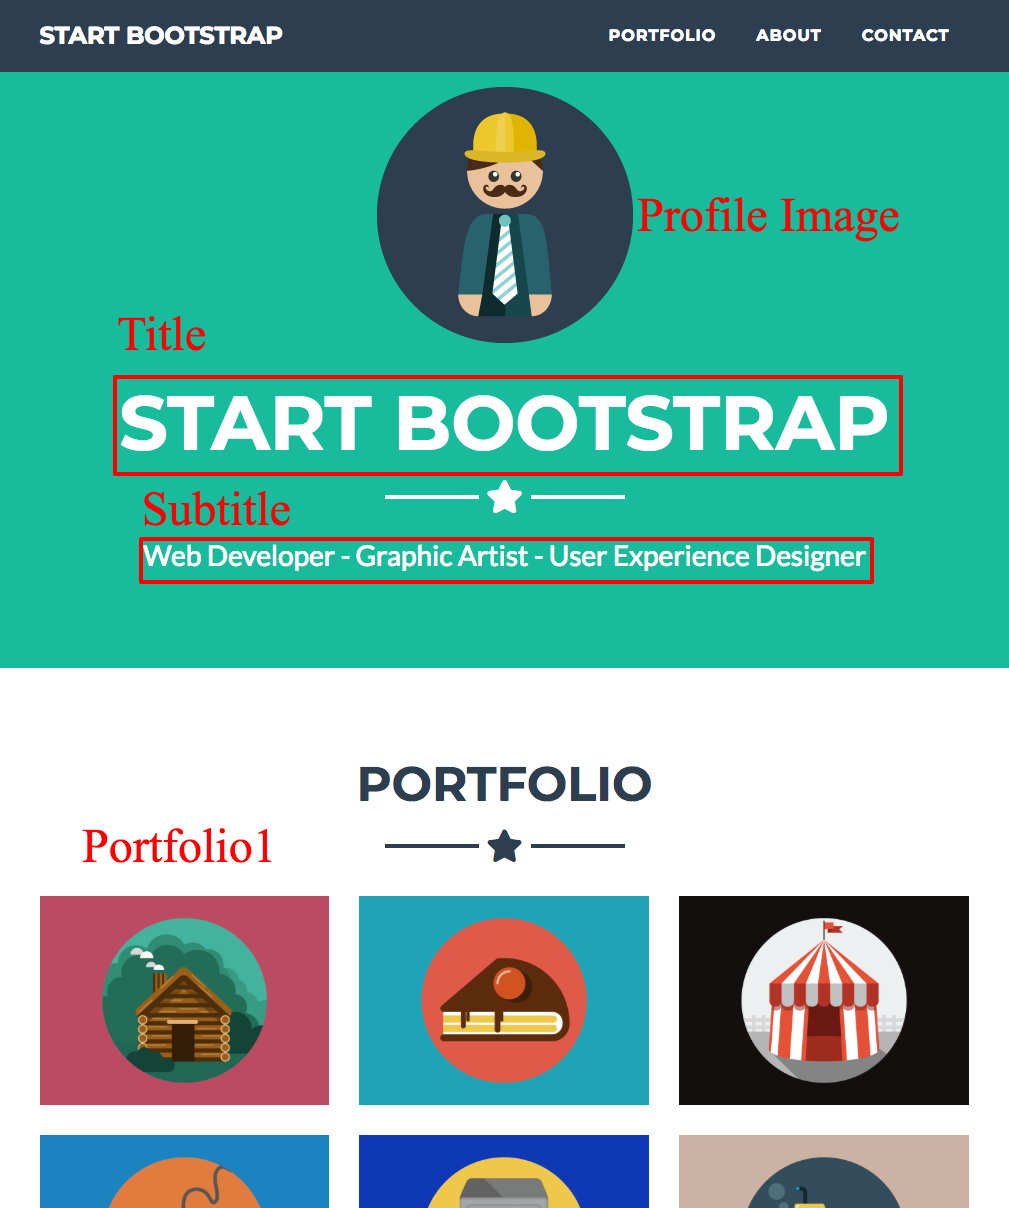
First, let's take a look at the sample landing page and try to analyze it.

Below are the fields that we wish to make them editable.
- Title (Start bootstrap)
- Subtitle (Web Developer - Graphic Artist - User Experience Designer)
- Profile image
- Portfolio (Contains more than one block)
We would talk more about portfolio in the next step, let's first define page models to make other fields editable, and below is the code snippet.
class FreelancerPage(AbstractForm):

    subtitle = models.CharField(max_length=100, blank=True)
    profile_image = models.ForeignKey(
        'wagtailimages.Image',
        blank=True,
        null=True,
        on_delete=models.SET_NULL,
        related_name='+'
    )

    content_panels = AbstractForm.content_panels + [
        MultiFieldPanel([
            FieldPanel('subtitle'),
            ImageChooserPanel('profile_image'),
        ], "Hero"),
        MultiFieldPanel([
            FieldPanel('about_text', classname="full"),
            FieldPanel('about_CTA_text'),
            FieldPanel('about_CTA_link'),
        ], "Hero"),

    ]
We also need to modify Django template to display the page content. If you have experience with HTML, this would be super easy.
{% if page.profile_image %}
  {% image page.profile_image original as profile_image %}
  <img src="{{ profile_image.url }}" class="img-fluid mb-5 d-block mx-auto rounded-circle">
{% else %}
  <img class="img-fluid mb-5 d-block mx-auto rounded-circle" src="{% static 'freelancer/img/profile.png' %}" alt="">
{% endif %}

<h1 class="text-uppercase mb-0">{{ page.title }}</h1>
<hr class="star-light">
<h2 class="font-weight-light mb-0">
    {{ page.subtitle }}
</h2>
Implement custom data models using Streamfield of Wagtail
Most CMS can get tasks above done in an easy way, but I really doubt if they can also get tasks below done in an elegant way.
Sometimes, we wish to define custom data models in pages so we can better manage them without touching tedious HTML.
Here, what is the best way to create&edit the content of portfolio?
- We can treat
portfoliofield in the page as a container. - The
portfoliocontainer can contain multipleportfolio block - Eash
portfolio blockhastitle, image, textfields.
We can add content to portfolio block , edit, reorder to manage the portfolio of the page.
Wagtail has a tech called StreamField to help us get this job done. With simple model definition code, we can config the model.
class FreelancerPage(AbstractForm):

    # code omitted for brevity

    portfolio = StreamField([
        ('portfolio', PortfolioBlock()),
    ], null=True, blank=True)

    content_panels = AbstractForm.content_panels + [
        StreamFieldPanel('portfolio'),
    ]

class PortfolioBlock(blocks.StructBlock):
    heading = blocks.CharBlock(classname="full title")
    image = ImageChooserBlock()
    intro = blocks.RichTextBlock()
As you can see this is very clean and easy to manage.
Please check the video below to see how StreamField works here.
Use Formbuilder of Wagtail to build form
In most landing pages, there would be a contact form for the reader to contact the site owner.
But, what if I want to add another field to the form, for example, a dropdown list which tell me your profession? Can I get it done without coding?
Wagtail has a FormBuilder feature to help editor create a flexible custom form with just clicks.
Here I would show you how to use it to build a simple contact form, but you can also use it to build your own custom form.
class FreelancerFormField(AbstractFormField):
    page = ParentalKey('FreelancerPage', related_name='form_fields')


class FreelancerPage(AbstractForm):
    content_panels = AbstractForm.content_panels + [
        InlinePanel('form_fields', label="Form fields"),
    ]
As you can see, this is easy and clean. After you defined the FreelancerPage, you an add, edit form fields in Wagtail admin. No coding needed any more.
Please check video below to see how FormBuilder works in Wagtail.
Conclusion
In this Wagtail tutorial, we learned how to use Wagtail CMS to build a landing page application, Wagtail CMS has 2 advantages compared with other CMS.
- The
StreamFieldis flexible and can let you define custom models in easy way. - The
FormBuilderfeature is also powerful and flexible, you can quickly build custom form in your application without using 3-party services.
Wagtail Tutorial Series:
To learn more about Wagtail CMS, please check Build Blog With Wagtail CMS (4.0.0)
- Create Wagtail Project
- Modern Frontend Techs for Wagtail
- Dockerizing Wagtail App
- Add Blog Models to Wagtail
- How to write Wagtail page template
- Create Stylish Wagtail Pages with Tailwind CSS
- How to use StreamField in Wagtail
- Wagtail Routable Page
- Add Pagination Component to Wagtail
- Customize Wagtail Page URL
- Add Full Text Search to Wagtail
- Add Markdown Support to Wagtail
- Add LaTeX Support & Code Highlight In Wagtail
- How to Build Form Page in Wagtail
- How to Create and Manage Menus in Wagtail
- Wagtail SEO Guide
- Online Demo http://wagtail-blog.accordbox.com/
- Source code: https://github.com/AccordBox/wagtail-tailwind-blog
Wagtail Tips:
- Wagtail Tip #1: How to replace ParentalManyToManyField with InlinePanel
- Wagtail Tip #2: How to Export & Restore Wagtail Site
Write style in Wagtail:
- How to use SCSS/SASS in your Django project (Python Way)
- How to use SCSS/SASS in your Django project (NPM Way)
Other Wagtail Topics:

