
Please check my course: The Definitive Guide to Celery and Django on testdriven.io
Introduction
In this Django Celery tutorial, I will talk about
- How to setup Celery with Django
- How to test Celery task in Django shell
- How to monitor Celery application with Flower
You can get the source code of this project at the end of this tutorial.
Why Django project need Celery
Celery can help run tasks on worker process instead of web process, so in web process we can return HTTP response back immediately (even the task in worker process is still running) to our user, the request cycle would not be blocked and user experience would be better.
Below are some cases Celery can help you
-
You built a comment app which supports
mention operation, user can use@to mention other user and they would receive email notifications. If one user mentions 10 people in one comment, the web process needs to process and send 10 emails. Sometimes this might be time-consuming (network, server and other factors), but Celery can let you send emails inbackground process, and you can return http response to user so he do not need to wait. -
When user upload image to your web application, you need to generate thumbnail, you can do the task in
worker process -
You need to do some period job, for example, generate daily report, clear expired session data. You can let Celery help send task at the target time to the
worker process.
When you build web application, you should try to make the response time of your web application lower than 500ms (New Relic or Scout APM can help), if some response time is big, you should figure out the reason and try to solve it. Celery can help when solving this problem.
Celery VS RQ
RQ (Redis Queue) is another Python library that can help you solve the above problems.
The core logic of RQ (Redis Queue) and Celery are the same (Producer/Consumer Pattern), here I would compare them and give you better understanding.
-
RQ (Redis Queue) is easy to learn and it aim to lower the barrier to use
async worker. It lacks some features and can only be used with Redis and Python -
Celery brings us more features, support many different backends and it is more flexible, so the doc is a little complex and beginner might be little confused.
Because Celery can help me solve some problems in better way so I prefer Celery, and I wrote this article to help reader (especially beginner) quickly learn Celery!
Message broker and Result backend
Message broker is the store which interacts as transport between producer and consumer
From Celery doc, RabbitMQ is top recommended for message broker because it supporst AMQP (Advanced Message Queuing Protocol)
But in many cases, we do not have to use features of AMQP so other message broker such as Redis is also ok.
Result backend is the store which save the result and error info or Celery task
Redis is recommended here.
How to setup Celery
Next, I will show you how to import Celery worker to your Django project.
We would use Redis as our message broker and result backend so it would be a little simpler to setup. But you can choose your preferred message broker and result backend based on your requirement.
Use Docker to help prepare the dev env
If you work on Linux or Mac, you can use the package manager to setup Redis for you. (brew, apt-get install), however, I'd like to recommend you to try using Docker to install Redis server here.
-
You can download
docker clienthere Get Docker -
Then try to run redis service
$ docker run -p 6379:6379 --name some-redis -d redis
Command above would run redis service on 127.0.0.1:6379
-
If you want to use
RabbitMQas message broker here, you just need to modify the command above to make that work. -
Once you finish your work, you can close Docker container and the env of your host machine is still clean.
Next, let's import Celery to our Django project
Create django project
# please create new python virtualenv and activate
$ pip install django==2.2
$ django-admin startproject django_celery_example
$ python manage.py startapp polls
Below is the project structure
.
├── django_celery_example
│   ├── __init__.py
│   ├── settings.py
│   ├── urls.py
│   └── wsgi.py
├── manage.py
└── polls
    ├── __init__.py
    ├── admin.py
    ├── apps.py
    ├── migrations
    │   └── __init__.py
    ├── models.py
    ├── tests.py
    └── views.py
celery.py
Next, let's start install and config Celery
# this would install Celery and redis-py
$ pip install -r requirements.txt
Create django_celery_example/celery.py beside django_celery_example/wsgi.py
"""
Celery config file

https://docs.celeryproject.org/en/stable/django/first-steps-with-django.html

"""
from __future__ import absolute_import
import os
from celery import Celery

# this code copied from manage.py
# set the default Django settings module for the 'celery' app.
os.environ.setdefault('DJANGO_SETTINGS_MODULE', 'django_celery_example.settings')

# you change change the name here
app = Celery("django_celery_example")

# read config from Django settings, the CELERY namespace would make celery
# config keys has `CELERY` prefix
app.config_from_object('django.conf:settings', namespace='CELERY')

# load tasks.py in django apps
app.autodiscover_tasks(lambda: settings.INSTALLED_APPS)


@app.task
def add(x, y):
    return x / y
init.py
Let's keep modifying django_celery_example/__init__.py
from __future__ import absolute_import, unicode_literals

# This will make sure the app is always imported when
# Django starts so that shared_task will use this app.
from .celery import app as celery_app

__all__ = ('celery_app',)
settings.py
Because Celery can read config from Django settings file, so we can add config there for better management.
CELERY_BROKER_URL = "redis://127.0.0.1:6379/0"
CELERY_RESULT_BACKEND = "redis://127.0.0.1:6379/0"
There are some thing you should keep in mind.
When you check celery doc, you would see broker_url is the config key you should set for message broker, however, in the above celery.py
-
app.config_from_object('django.conf:settings', namespace='CELERY')tell Celery to read value fromCELERYnamespace, so if you setbroker_urlin your Django settings file, the setting would not work. This rule also apply for all Celery config keys in the doc. -
Some config key is different between Celery 3 and Celery 4, so please check the doc when you do config.
Send job to Celery
Now the config job is done, let's start trying Celery and see how it works. Here we would run some commands in different terminal, but I recommend you to take a look at Tmux when you have time.
First, run Celery worker in one terminal, the django_celery_example is the Celery app name you set in django_celery_example/celery.py
$ celery worker -A django_celery_example --loglevel=info

[config]
.> app:         django_celery_example:0x1034783c8
.> transport:   redis://127.0.0.1:6379/0
.> results:     redis://127.0.0.1:6379/0
.> concurrency: 8 (prefork)
.> task events: OFF (enable -E to monitor tasks in this worker)

[queues]
.> celery           exchange=celery(direct) key=celery


[tasks]
  . django_celery_example.celery.add
Second, let's run a web app to help us monitor the Celery task (I will talk about more about it in a bit)
$ flower -A django_celery_example --port=5555
Then you can open http://localhost:5555/ and you will see a web dashboard which can help you check the details of the Celery worker
Next, we enter Django shell and try to send some tasks to Celery worker
$ python manage.py migrate
$ python manage.py shell
>>> from django_celery_example.celery import add
>>> task = add.delay(1, 2)
Below are some points here
-
We use
xxx.delayto send message to message broker, and the worker process would pick that task and run. -
After you press
enterkey after typingtask = add.delay(1, 2), the code finished soon (not blocked) but theaddmethod still running in celery worker process. -
If you check celery worker terminal output, you will see something like this
03:54:40,072: INFO/MainProcess] Received task: django_celery_example.celery.add[6501dc00-d422-4832-b8ab-fc72a8311586]
03:54:50,082: INFO/ForkPoolWorker-8] Task django_celery_example.celery.add[6501dc00-d422-4832-b8ab-fc72a8311586] succeeded in 10.00722316399333s: 0.5
The worker process received the task at 03:54:40, and after 10 seconds, the task succeeded.
I guess now you already have a basic understanding about the workflow. Let's try another code block
>>> import time
>>> from django_celery_example.celery import add
>>> task = add.delay(1, 2)
>>>
>>> for i in range(13):
>>>     time.sleep(1)
>>>     print(task.state, task.result)


PENDING None
PENDING None
PENDING None
PENDING None
PENDING None
PENDING None
PENDING None
PENDING None
PENDING None
SUCCESS 0.5
SUCCESS 0.5
SUCCESS 0.5
SUCCESS 0.5
-
When we call
delaymethod, we gettaskinstance which can we use to query the task state and result. -
Here we
pollthe state and result every 0.5 second and you can see the progress.
Next, let's try to raise error in the Celery worker and see what happen.
>>> import time
>>> from django_celery_example.celery import add
>>> task = add.delay(1, 0)

>>> type(task)
celery.result.AsyncResult

# here we wait for about 10 seconds, and then check the state and result
>>> task.state
'FAILURE'

>>> task.result
ZeroDivisionError('division by zero')
As you can see, after we called delay method, we get an AsyncResult instance.
We can use it to do many useful thing such as
-
Check the task state.
-
Check the task return value or exception details.
-
Check other metadata of the task.
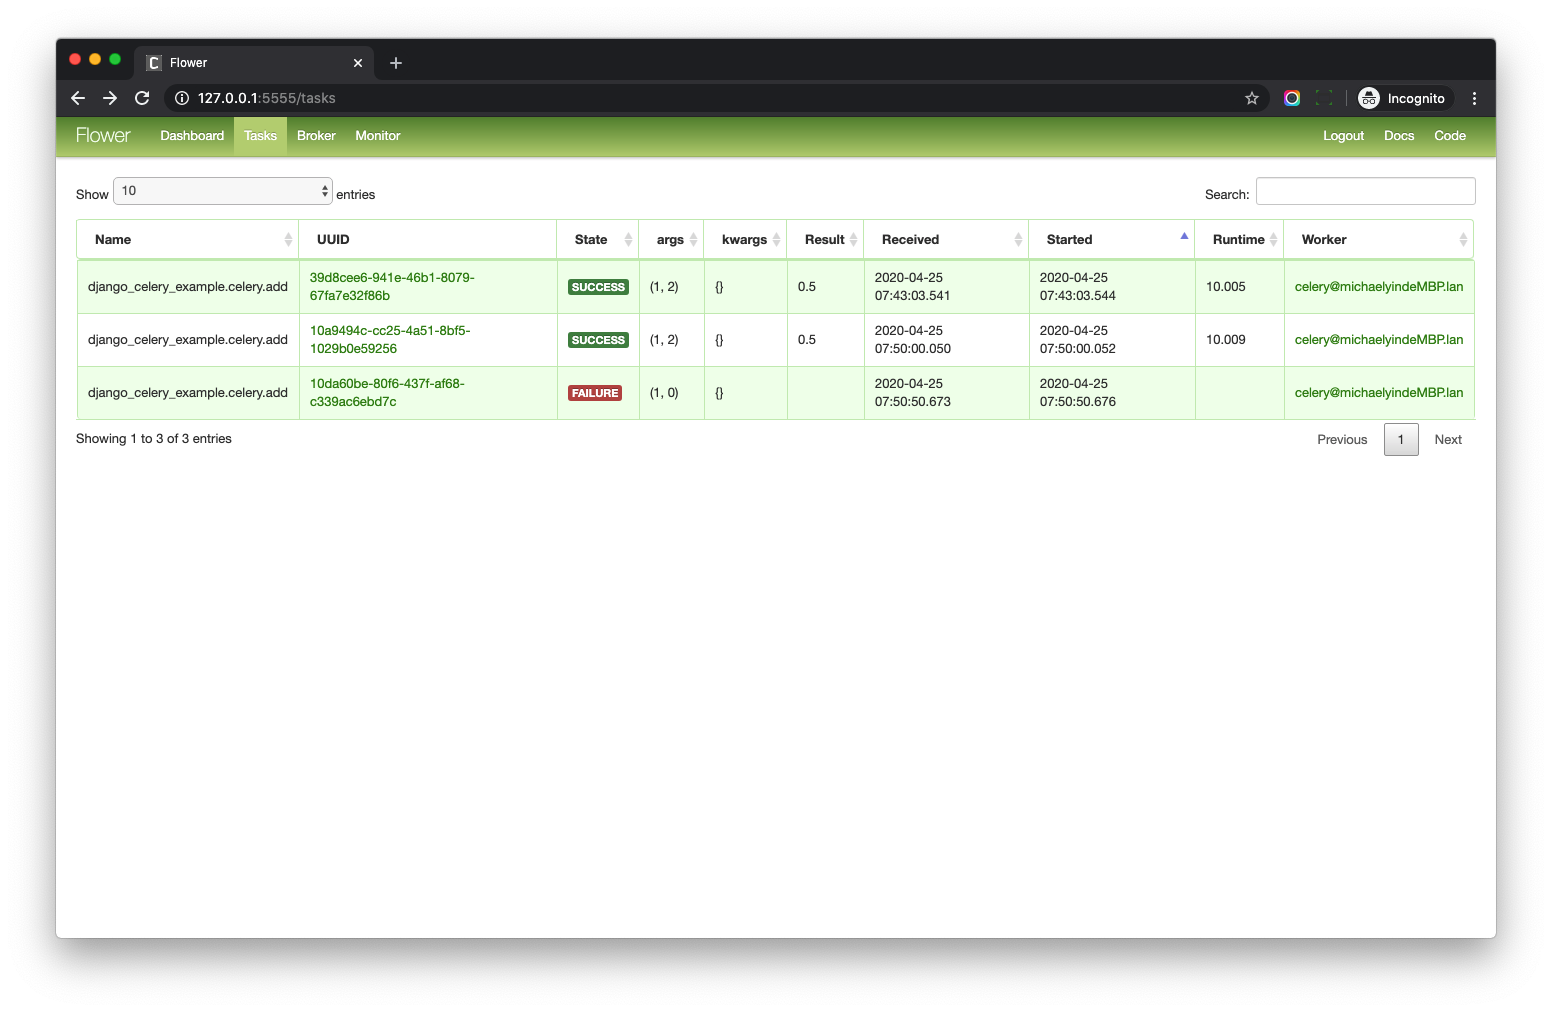
Monitor Celery with Flower
flower can let us monitor Celery in UI friendly web page, because it can help us better understand more details of Celery, so I decide to talk about it before diving further.
The web dashboard URL is http://127.0.0.1:5555/
Please check the tasks page.
What you should notice is the UUID column, which is AsyncResult.id
You can also get similar details of one task with code below.
>>> from celery.result import AsyncResult
>>> # 10da60be-80f6-437f-af68-c339ac6ebd7c here is the UUID copied from web page
>>> task = AsyncResult('10da60be-80f6-437f-af68-c339ac6ebd7c')
>>> task.state
'FAILURE'
>>> task.result
ZeroDivisionError('division by zero')
When you learn Celery, you can use Flower to help you understand the details.
When you deploy your project to the server, Flower is optional. I mean, you an also use Celery commands to help manage the application and check the worker status.
Conclusion
In this blog post, I talked about some basic parts of Celery. I wish you already have a good understanding of the whole workflow.
Please check my course: The Definitive Guide to Celery and Django on testdriven.io